


In this blog, we will embark on a journey to unravel the essence of MVC and discover how it empowers developers to create efficient and scalable software. Whether you are a seasoned developer or just starting your web development adventure, this blog will serve as your comprehensive guide to understanding and harnessing the potential of MVC.
Throughout our exploration, we will delve into the core components of MVC: the Model, the View, and the Controller. We will examine their individual roles and responsibilities, their interactions, and how they collaborate harmoniously to create a well-structured application.
But our journey doesn't end there. We will also dive into the key principles underlying MVC, exploring concepts such as separation of concerns, loose coupling, and single responsibility. We will discuss the implementation of each component, along with best practices and real-world examples to solidify your understanding.
Moreover, we will explore the variations of MVC and popular frameworks that utilize this architecture, opening doors to a world of possibilities in web development. From understanding event-driven architectures to incorporating dependency injection and testing methodologies, we will equip you with the tools and knowledge to take your applications to the next level.
So, whether you aspire to build a dynamic blog, a robust e-commerce platform, or any other web application, join us on this captivating journey into the heart of MVC. Let's unlock the potential of structured web development together and pave the way for scalable, maintainable, and remarkable software creations.
Introduction to MVC

Let's dive straight into MVC.
Model: contains all of an application’s data, and has the ability to manipulate that data. It has no interaction with the View but does communicate with the Controller.
View: is everything that you, the user see in the browser. Usually HTML, CSS and Javascript. It’s pretty dumb and never has any interaction with the Model.
Controller: Definitely the coolest element of MVC. It takes in requests from the browser, contacts the Model for any data it might need, and then grabs the proper View to display that data to you, the user.
Now just have the explanation of the above MVC architecture using the example of the Restaurant.
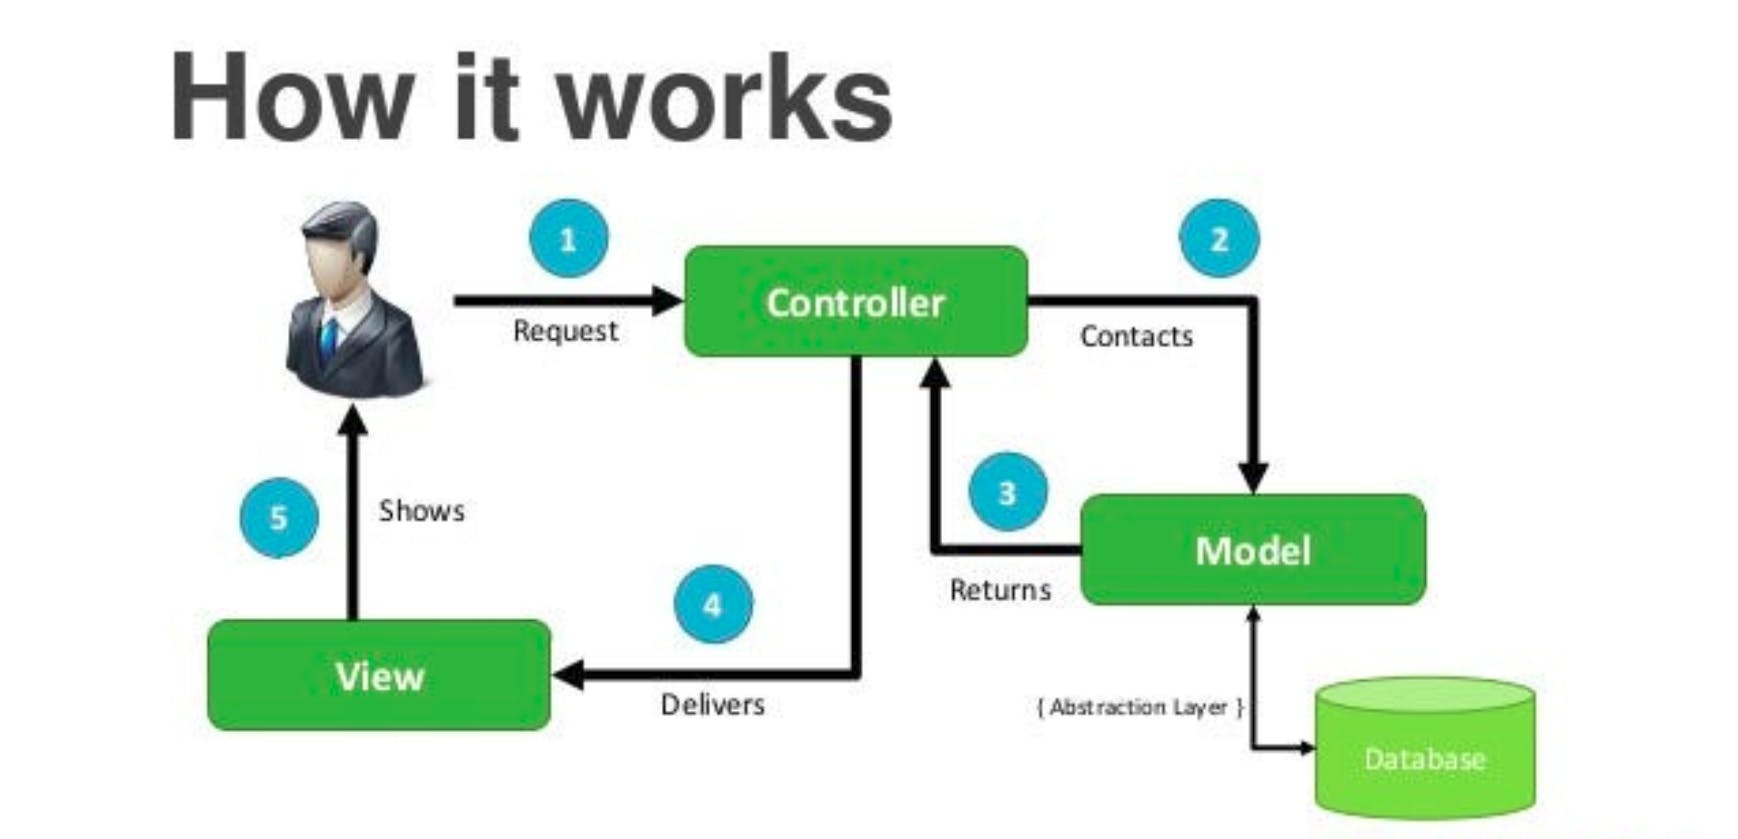
In a restaurant, the Chef is the Model. Its job is to take orders (requests) from the Waiter and create some awesome food for the Waiter to deliver to the Customer.

The Waiter is the Controller. They take in orders (requests), take them back to the Chef (Model), and then deliver the proper meal to customers (Users).

The Table is the View. It just holds whatever meal the Waiter brings back from the Chef.

Creating MVC Architecture and Understanding its Parts
Firstly, Create the project folder where you want to store all the codes.
mkdir MVC_BlogWhen you start with the project, you need to create the package.json so first create that using the following command.
npm initDownload the required packages for the project
Express is a fast and minimalist web application framework for Node.js.It provides a set of features for building web applications and APIs, such as routing, middleware support, template rendering, and more. Express simplifies the process of handling HTTP requests and responses, making it easier to build robust and scalable web applications. With Express, you can define routes, handle different HTTP methods (GET, POST, etc.), parse request bodies, set up middleware functions, and serve static files.
npm install expressdotenv is a zero-dependency Node.js package that loads environment variables from a
.envfile intoprocess.env. Environment variables are useful for storing sensitive or configuration-specific information like API keys, database credentials, and other settings. dotenv allows you to define these variables in a separate.envfile, which can be kept outside of version control to maintain security. When your Node.js application starts, dotenv reads the.envfile and sets the defined variables inprocess.env, making them accessible throughout your application.npm install dotenvhttp-status-codes is a package that provides a comprehensive list of HTTP status codes as constants in Node.js. It simplifies the process of handling HTTP responses by providing an easy-to-use interface to reference standard HTTP status codes. Instead of manually specifying status codes like 200, 404, or 500, you can use the constants provided by http-status-codes to enhance readability and maintainability in your code. The package also offers utility functions to check if a given code is informational, successful, redirection, client error, server error, etc.
npm install http-status-codesnodemon is a development tool that helps in automatically restarting a Node.js application whenever file changes are detected. During development, you often make changes to your code and need to restart the server to see the effects. nodemon eliminates the need for manual restarts. With nodemon, you can simply run your Node.js application with the
nodemoncommand instead ofnode, and it will monitor the file system for changes. When a file is modified, nodemon automatically restarts the application, saving you the hassle of manually stopping and starting the server each time you make changes. nodemon also provides additional features like customizable ignore patterns, environment variable configuration, and more.npm install nodemon
Now, we have completed the installation of all required packages.
Setting up the Source folder (src/)
The src/ folder is a common convention used in software development projects to store the source code files of the application. It stands for "source" and typically contains the main codebase of the project. Here's an explanation of the src/ folder and its significance:
Organization and Separation: The
src/folder is used to separate the source code files from other project files, such as configuration files, build scripts, tests, etc. It helps maintain a clean and organized project structure.Main Codebase: The
src/folder usually contains the primary code files of your application. These files may include the main entry point of the application, core modules, utility functions, components, models, controllers, views, routes, and other code modules that contribute to the functionality of the application.Development and Production: The
src/folder is primarily used during the development phase of the project. It serves as a central location where developers can work on and modify the codebase. When the project is ready for production deployment, the code from thesrc/folder is typically compiled, bundled, or processed into a form suitable for deployment.Code Compilation and Transpilation: Depending on the programming language or framework used, the source code within the
src/folder may undergo various transformations before being deployed. For example, in languages like TypeScript or Babel-enabled JavaScript projects, the source code may be transpiled into plain JavaScript using a build step. Similarly, in languages like Java or C#, the source code may be compiled into executable binaries.Build Process and Tools: The
src/folder is often integrated with build tools or task runners like webpack, Gulp, or Grunt. These tools can automate tasks such as bundling, minification, code linting, and generating optimized assets. The output of these build processes is typically stored in a separate folder (e.g.,dist/orbuild/) for deployment.
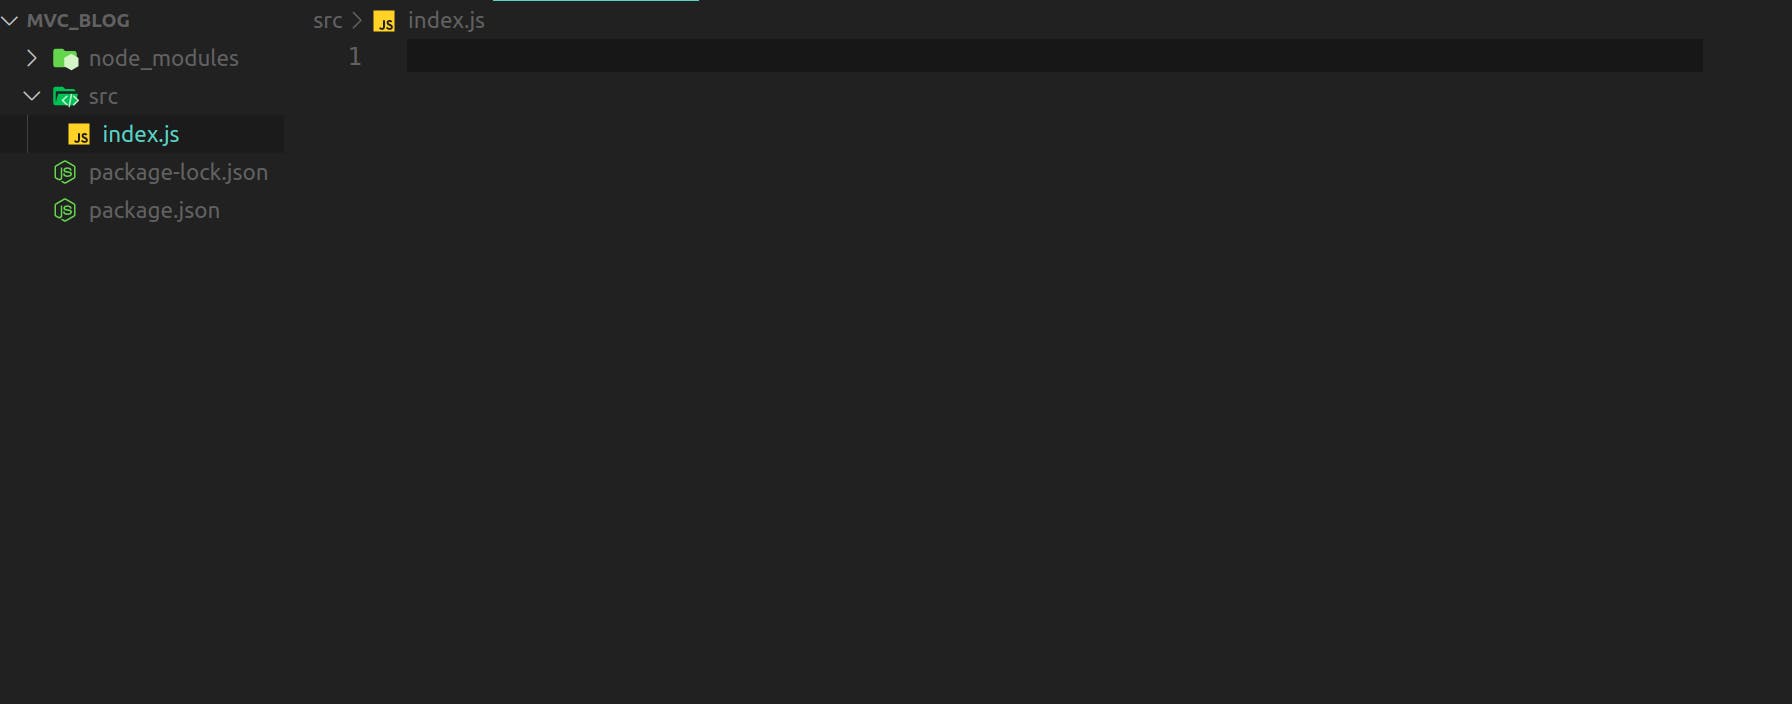
we have set up the src/ folder which will contain all our code.
Now, Move forward and set up more folders in the src/ folder which form the basis of MVC architecture.
Setting up the 'config' folder (src/config)
The config/ folder is commonly used in software development projects to store configuration files. It typically contains files that define settings, parameters, and options for your application. Here's an explanation of the config/ folder and its significance:
Separation of Configuration: The
config/folder provides a dedicated location to store configuration files separately from the source code. This separation allows for easy modification of settings without the need to modify the application's code.Centralized Configuration: The
config/folder serves as a central repository for storing various configuration files. These files can contain environment-specific settings, database connection details, API keys, feature toggles, logging configuration, and other parameters required for the application to function correctly.Environment-specific Configuration: Often, an application needs different configuration values depending on the environment it is running in (e.g., development, staging, production). The
config/folder allows you to organize separate configuration files for each environment, making it easier to manage and switch between different configurations based on the deployment environment.Configuration Loading: Within the application's codebase, there is usually logic or code that loads and reads the configuration files stored in the
config/folder. This code fetches the necessary values from the configuration files and uses them to initialize various components or apply settings throughout the application.Security and Secrets: The
config/folder is often used to store sensitive information that should not be hard-coded in the application's source code. This can include credentials, API keys, tokens, or any other secrets required for secure communication or authentication. Care should be taken to protect these configuration files and prevent unauthorized access.Version Control Considerations: Depending on the project's requirements and security policies, the
config/folder may or may not be included in version control. It is common to exclude sensitive or environment-specific configuration files from version control systems like Git and provide template files instead. Developers can then copy these templates and customize them for their local environment or specific deployment scenarios
Now we will code our config folder, setting up the env port using dotenv and utilizing this by express to set up the HTTP server.
Setting up .env file
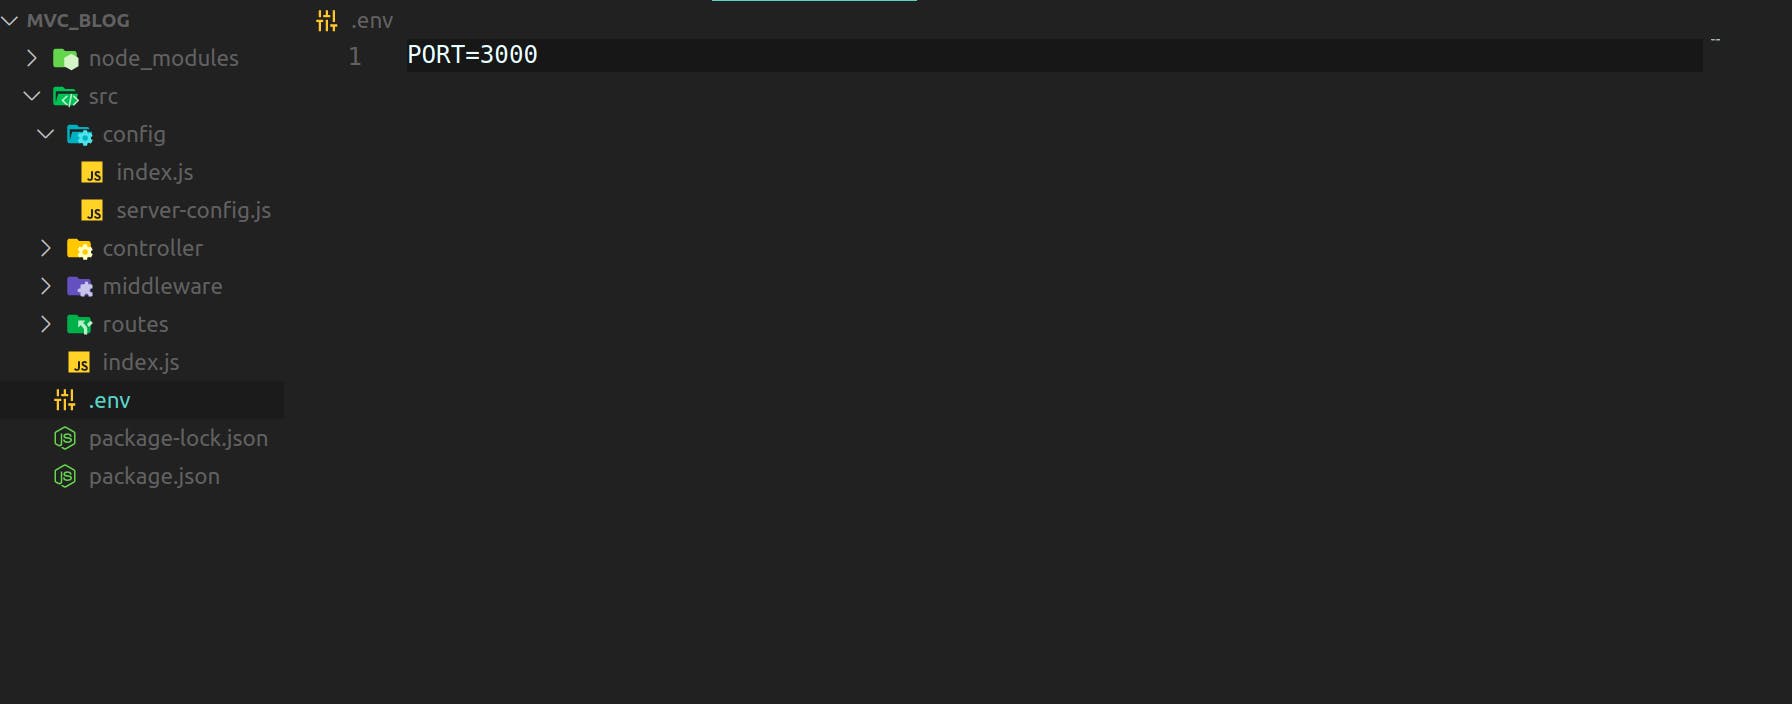
PORT=3000 //in .env fileThe
.envfile stores environment-specific configuration variables, allowing for easy customization and enhanced security in applications. It centralizes configuration settings, protects sensitive information, and facilitates application initialization by loading variables into the runtime environment.Creating server-config.js
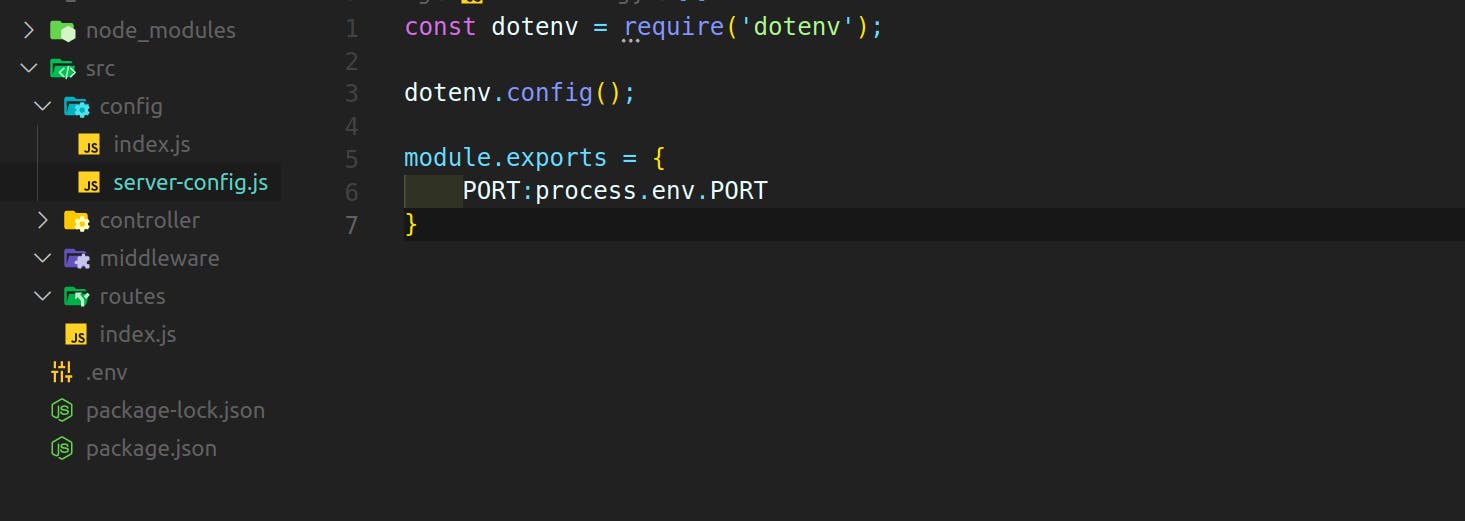
  //in server-config.js inside config folder
  const dotenv = require('dotenv');

  dotenv.config();

  module.exports = {
      PORT:process.env.PORT
  }
imports the
dotenvpackage, which is used for loading environment variables from a.envfile.dotenv.config()is called to read and parse the.envfile, populating the process environment with the variables defined in the file.The
module.exportsstatement exports an object with a single propertyPORT. The value ofPORTis set toprocess.env.PORT, which retrieves the value of thePORTenvironment variable that was loaded from the.envfile.
By using dotenv.config(), the code ensures that the .env file is read and its variables are available to the application through the process.env object. The module.exports statement exports the PORT variable, making it accessible to other parts of the code that import this module.
Exporting the PORT so that we can create HTTP-server from it

  //in index.js inside config/
  module.exports ={
      ServerConfig: require('./server-config')
  }
we can use this in upcoming code to setup servers
Setting up HTTP-server using express js
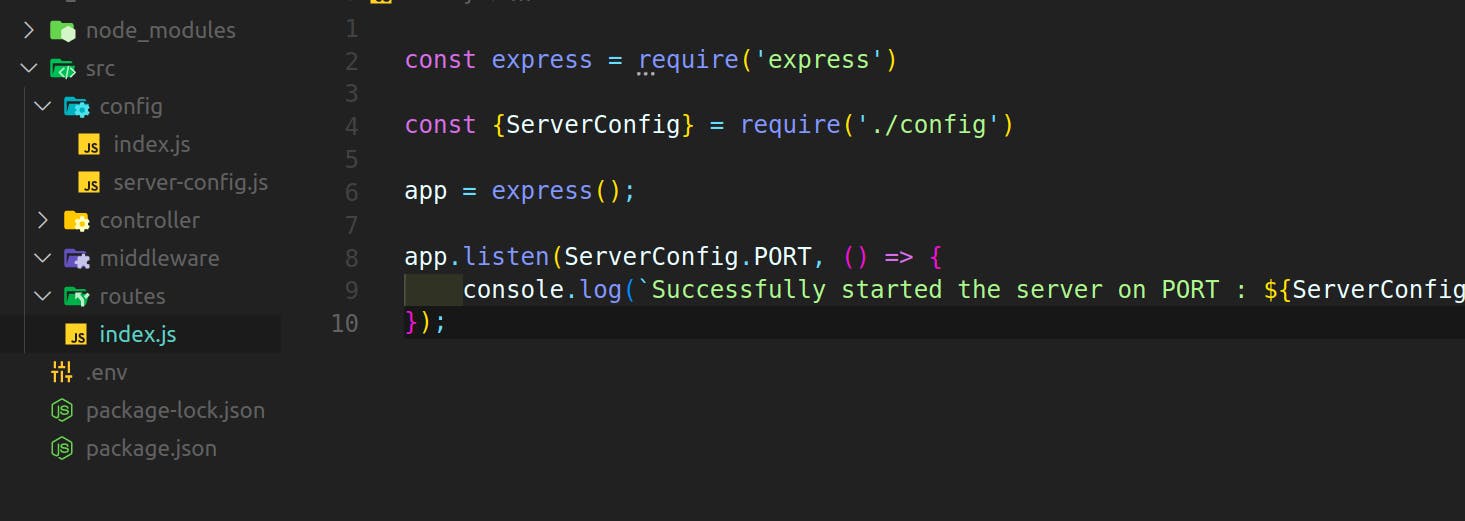
  //in index.js inside src/
  const express = require('express')

  const {ServerConfig} = require('./config')

  app = express();

  app.listen(ServerConfig.PORT, () => {
      console.log(`Successfully started the server on
                   PORT : ${ServerConfig.PORT}`);
  });
const express = require('express'): This line imports the Express framework, making it available for use in the code.const { ServerConfig } = require('./config'): This line imports theServerConfigobject from a file calledconfig.jsin the same directory. TheServerConfigobject is expected to contain the configuration settings for the server, including thePORTvalue.app = express(): This line creates an instance of the Express application by calling theexpress()function. The resultingappvariable represents the Express application and allows you to define routes, middleware, and other settings.app.listen(ServerConfig.PORT, () => {...}): This line starts the server and makes it listen on the port specified in theServerConfig.PORTvalue. Thelisten()method is provided by Express and takes the port number and an optional callback function.console.log(Successfully started the server on PORT : ${ServerConfig.PORT}): This line logs a success message to the console when the server starts. It uses string interpolation to include theServerConfig.PORTvalue in the log message.
Overall, this code sets up an Express server, configures it to listen on a specified port, and displays a success message when the server starts successfully. It assumes that the config.js file contains the necessary server configuration, including the desired port number.
Start the Server :
npx nodemon src/inedx.jsOR Automatically set this in the project using nodemon in package.json writing the script using it
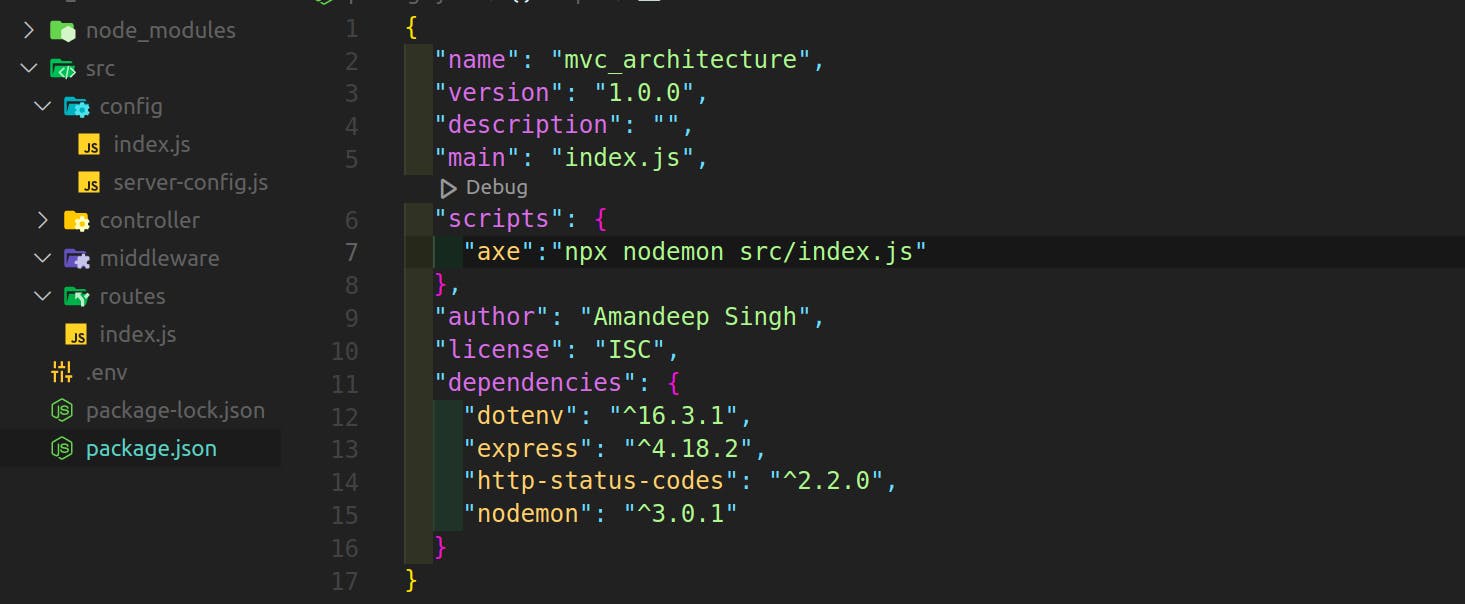
see the script part, you have indulged that code in it
So now just open the terminal and run
npm run axethe following output will be displayed
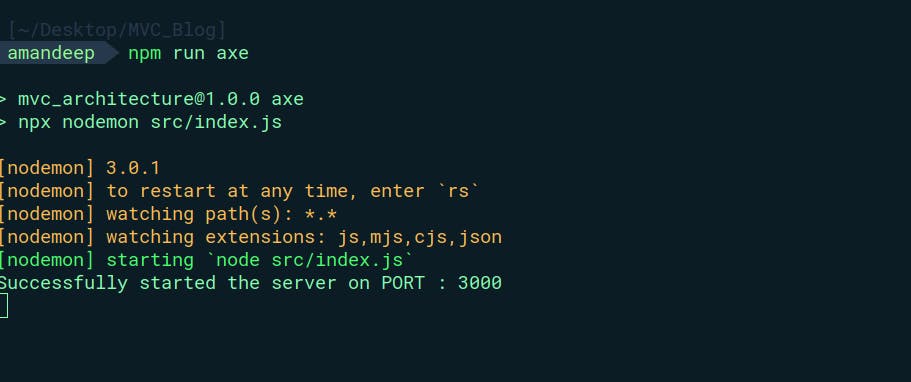
now your HTTP-Server is created now you can handle various requests.
What is View?
The "View" represents the presentation layer of an application. It is responsible for rendering and displaying the user interface to the user. The View receives data from the Model and formats it for presentation to the user. It also handles user interactions and events, forwarding them to the Controller for processing.
Here's a detailed explanation of the View component in MVC with an example:
Presentation Logic: The View contains the logic for how the data should be presented to the user. It defines the structure, layout, and appearance of the user interface elements. This includes HTML templates, CSS styles, and any client-side scripting necessary for rendering dynamic content.
Data Display: The View receives data from the Model and transforms it into a format that can be displayed to the user. It may apply formatting, filtering, or sorting to the data before rendering it. For example, if a blog application wants to display a list of blog posts, the View will receive the blog post data from the Model and render it in an organized manner on the web page.
User Interaction: The View handles user interactions, such as button clicks, form submissions, or mouse events. It captures these events and forwards them to the Controller for further processing. For example, when a user clicks a "Delete" button on a blog post, the View will trigger an event that informs the Controller to handle the deletion of that specific post.
View Updates: In response to user actions or changes in the Model, the View updates its presentation accordingly. For example, if the Model data changes (e.g., a new blog post is added), the View updates its display to reflect the new data. This update can be triggered by events or notifications from the Model or Controller.
Separation of Concerns: The View is designed to be independent of the underlying data and business logic. It focuses solely on presenting the data to the user and capturing user interactions. This separation of concerns promotes modularity, testability, and code reusability.
Example: In a blog application, the View component can be responsible for rendering the blog post listings, displaying individual blog posts, and handling user interactions like adding comments or navigating between pages. The View receives data from the Model, formats it into HTML templates, and displays it to the user. It also captures user actions, such as submitting a comment form, and notifies the Controller to handle the corresponding logic, such as adding the comment to the database.
Overall, the View in MVC is responsible for presenting data to the user, handling user interactions, and updating the interface based on changes in the Model. It plays a crucial role in separating the presentation logic from the underlying application logic, promoting a clean and maintainable architecture.
Note: we don't render our code from the backend so no view folder is created this type of rendering usually takes place in Django or Ruby on Rails called server side rendering not good for user interaction but with the use of Reactjs or Angular they can make the direct request to the controller perform client-side rendering.
About Controller folder
the "Controller" is responsible for handling user input, processing requests, and coordinating the interaction between the Model and the View. It contains the business logic of the application and acts as an intermediary between the user interface and the data.
Here's an overview of the Controller component in MVC with an example:
Request Handling: The Controller receives requests from the user interface (typically initiated by user interactions) and determines the appropriate action to take based on the request type and the data provided. It maps incoming requests to specific methods or functions in the Controller that handle the request.
Input Validation and Sanitization: The Controller validates and sanitizes the incoming user input to ensure its integrity and correctness. It checks for data format, performs validation against business rules, and sanitizes the data to prevent security vulnerabilities.
Interaction with the Model: The Controller communicates with the Model to retrieve and manipulate data. It invokes methods or functions in the Model to perform database queries, update records, or retrieve data needed for processing. The Controller also passes data from the Model to the View for display.
Business Logic and Processing: The Controller contains the business logic of the application. It performs computations, applies rules, executes algorithms, and orchestrates the flow of data and operations to fulfill the user's request. The Controller ensures that the requested actions are performed correctly and consistently.
View Selection and Data Preparation: After processing the request, the Controller determines the appropriate View to use for presenting the response. It prepares the necessary data to be sent to the View, extracting relevant information from the Model or other data sources. The Controller provides the View with the required data for rendering.
Example: In a blog application, the Controller component can handle actions such as creating a new blog post, retrieving a list of blog posts, updating a blog post, or deleting a blog post. It receives the request from the user interface (e.g., through a route defined in the application), validates the input data, interacts with the Model to perform the necessary operations (e.g., saving data to a database), and prepares the data to be displayed in the appropriate View. The Controller ensures that the requested actions adhere to the business rules of the application.
Overall, the Controller in MVC acts as the intermediary between the user interface, the Model, and the View. It handles user requests, performs input validation, interacts with the Model for data operations, applies business logic, and prepares data for presentation in the View. This separation of concerns allows for modularity, code reusability, and easier maintenance of the application.
Setting up the Controller folder

All About middlewares
The "middleware" folder is a common convention used to organize and store middleware functions in a web application. Middleware functions sit between the incoming request and the final response, allowing for additional processing, modifications, or handling of the request. Here's a detailed explanation of the middleware folder with an example:
Purpose of Middleware:
Middleware functions serve as a bridge between the application's server and the routes or handlers that process incoming requests.
They provide a way to perform operations such as authentication, logging, data validation, error handling, request preprocessing, and more.
Middleware functions can modify the request or response objects, execute additional code, or terminate the request-response cycle.
Organization in the Middleware Folder:
The middleware folder typically contains individual files, each representing a middleware function or a set of related middleware functions.
These files may have specific names, such as
auth.js,logging.js,validation.js, to indicate their purpose or functionality.Grouping middleware functions in a dedicated folder improves code organization, readability, and maintainability.
Middleware Function Example:
Let's consider an example where the middleware folder contains a file named
auth.js.Inside
auth.js, a middleware function can be defined to check if the user is authenticated before proceeding to the protected routes:const isAuthenticated = (req, res, next) => { if (req.user) { // User is authenticated next(); // Proceed to the next middleware or route handler } else { // User is not authenticated res.status(401).json({ message: 'Unauthorized' }); } };In this example, the
isAuthenticatedmiddleware function checks if thereq.userproperty is set, indicating that the user is authenticated.If the user is authenticated, the function calls
next()to pass control to the next middleware function or route handler in the chain.If the user is not authenticated, the function sends a 401 Unauthorized response to the client.
Applying Middleware in Routes:
Middleware functions are applied to specific routes or globally in the application to process incoming requests.
In the routes file or main server file, middleware functions can be imported from the middleware folder and used as follows:
  const express = require('express');
  const authMiddleware = require('./middleware/auth');

  const app = express();

  // Apply middleware to a specific route
  app.get('/protected', authMiddleware.isAuthenticated, (req, res) => {
    // Only authenticated users can access this route
    res.send('Protected route');
  });

  // Apply middleware globally to all routes
  app.use(authMiddleware.isAuthenticated);
In this example, the
authMiddleware.isAuthenticatedmiddleware function is applied to the/protectedroute, allowing only authenticated users to access it.Additionally, the same middleware function is applied globally using
app.use(), ensuring that it runs for all incoming requests.
The middleware folder is a key component in building robust web applications, enabling the execution of additional processing or modifications before handling requests. It promotes code reusability, separation of concerns, and enhances the overall flexibility and extensibility of the application.
All About Models folder
the "Models" folder is a common convention used to organize and store the models or data structures that represent the entities and logic of an application. The Models folder contains the data models that define the structure and behavior of the data being used in the application. Here's a detailed explanation of the Models folder with an example:
Purpose of Models:
Models represent the application's entities, such as users, products, blog posts, or any other domain-specific objects.
They define the structure, attributes, relationships, and behavior associated with the entities.
Models encapsulate the data access and manipulation logic, allowing for consistent and efficient management of data.
Organization in the Models Folder:
The Models folder typically contains individual files, each representing a specific model or entity.
These files may have names that reflect the entity they represent, such as
User.js,Product.js, orBlogPost.js.Grouping models in a dedicated folder improves code organization, separation of concerns, and ease of maintenance.
Model Example:
Let's consider an example where the Models folder contains a file named
User.js.Inside
User.js, the model can be defined using a class or a schema depending on the chosen framework or library. Here's an example using a class:class User { constructor(username, email, password) { this.username = username; this.email = email; this.password = password; } // Additional methods and functionalities specific to User model // Example: Methods for user authentication, profile management, etc. } module.exports = User;In this example, the
Usermodel is defined as a class with properties forusername,email, andpassword.The constructor function sets the initial values of these properties when a new instance of the User class is created.
Additional methods and functionalities specific to the User model can be added to perform actions like authentication, profile management, etc.
Using Models:
Models are used in other parts of the application, such as controllers, routes, or other service layers.
In these components, the models are imported from the Models folder and instantiated to work with the data.
For example, in a user registration controller, the User model can be used to create a new user object and save it to the database.
  const User = require('./models/User');

  const registerUser = (req, res) => {
    const { username, email, password } = req.body;

    const newUser = new User(username, email, password);
    // Save the newUser object to the database or perform other operations
  };
In this example, the User model is imported from the Models folder and used to create a new instance of the User class, passing the necessary data.
The Models folder plays a crucial role in defining the structure, behavior, and logic of the application's entities. It promotes code organization, reusability, and separation of concerns. By encapsulating the data manipulation logic within models, it allows for consistent and efficient management of data throughout the application.
Migration folder in MVC
The "Migration" folder is a common convention used when working with database management systems, such as Sequelize, to manage database schema changes over time. The Migration folder contains scripts that define and execute database schema alterations, allowing for version control and easy migration between different database states. Here's a detailed explanation of the Migration folder with an example using the Sequelize query builder:
Purpose of Migrations:
Migrations provide a way to make changes to the database schema over time, such as creating or modifying tables, adding or removing columns, defining relationships, and more.
They ensure that the database schema evolves along with the application, allowing for seamless updates and version control of the database structure.
Migrations help manage the state of the database across different environments (e.g., development, staging, production) and enable collaboration among developers working on the same project.
Organization in the Migration Folder:
The Migration folder typically contains individual migration files, each representing a specific schema change or set of related changes.
These files often have timestamped names to indicate their order of execution and to ensure proper sequencing of the migrations.
Grouping migrations in a dedicated folder allows for easy organization, tracking, and execution of schema changes.
Migration Example using Sequelize Query Builder:
Let's consider an example using the Sequelize query builder to create a migration that adds a new table to the database.
Inside the Migration folder, a new migration file named
20220101123456-create-posts.jscan be created. The timestamped name ensures the migration runs in the correct order.The migration file may look like this:
  'use strict';

  module.exports = {
    up: async (queryInterface, Sequelize) => {
      await queryInterface.createTable('Posts', {
        id: {
          allowNull: false,
          autoIncrement: true,
          primaryKey: true,
          type: Sequelize.INTEGER
        },
        title: {
          type: Sequelize.STRING,
          allowNull: false
        },
        content: {
          type: Sequelize.TEXT,
          allowNull: false
        },
        createdAt: {
          allowNull: false,
          type: Sequelize.DATE
        },
        updatedAt: {
          allowNull: false,
          type: Sequelize.DATE
        }
      });
    },

    down: async (queryInterface, Sequelize) => {
      await queryInterface.dropTable('Posts');
    }
  };
In this example, the migration file defines an
upmethod and adownmethod. Theupmethod is responsible for defining the schema changes to be applied (creating thePoststable), while thedownmethod defines the reverse changes (dropping thePoststable).
Executing Migrations:
Migrations are executed using tools provided by the query builder or ORM (e.g., Sequelize CLI, database management tools).
The migration files in the Migration folder are executed sequentially to apply the schema changes, ensuring that the database state matches the expected schema defined by the migrations.
For example, using Sequelize CLI, you can run the following command to execute migrations:
npx sequelize-cli db:migrate
This command will execute the pending migrations, applying the schema changes defined in each migration file that has not been executed yet.
The Migration folder provides a structured approach to manage and execute database schema changes over time. It enables version control, easy collaboration, and seamless updates of the database schema. Migrations using the Sequelize query builder offer a convenient way to define and apply changes to the database structure while maintaining data integrity and consistency.
Repositories folder
the "Repositories" folder is a common convention used to organize and store data access logic in an application. The Repositories folder contains classes or modules responsible for interacting with the database or external data sources. Here's an explanation of the Repositories folder with an example:
Purpose of Repositories:
Repositories encapsulate the data access logic, providing an abstraction layer between the application and the underlying data sources (e.g., databases, APIs).
They handle operations such as querying, inserting, updating, and deleting data, abstracting away the complexities of the data storage technology.
Repositories help centralize and manage the interactions with data sources, promoting separation of concerns and modularity.
Organization in the Repositories Folder:
The Repositories folder typically contains individual files, each representing a specific data entity or related group of entities.
These files may have names that reflect the entity or data source they interact with, such as
UserRepository.js,ProductRepository.js, orOrderRepository.js.Grouping repositories in a dedicated folder improves code organization, separation of concerns, and ease of maintenance.
Repository Example:
Let's consider an example where the Repositories folder contains a file named
UserRepository.js.Inside
UserRepository.js, the repository class or module can be defined to handle data access operations related to users:class UserRepository { constructor(database) { this.database = database; } async getById(id) { // Logic to fetch user by id from the database // Example: return this.database.query('SELECT * FROM users WHERE id = ?', [id]); } async create(user) { // Logic to create a new user in the database // Example: return this.database.query('INSERT INTO users (name, email) VALUES (?, ?)', [user.name, user.email]); } async update(user) { // Logic to update an existing user in the database // Example: return this.database.query('UPDATE users SET name = ?, email = ? WHERE id = ?', [user.name, user.email, user.id]); } async delete(id) { // Logic to delete a user from the database // Example: return this.database.query('DELETE FROM users WHERE id = ?', [id]); } } module.exports = UserRepository;In this example, the
UserRepositoryclass is defined, which takes adatabaseobject or dependency as a constructor parameter.The class contains methods for common data access operations related to users, such as
getById,create,update, anddelete.Inside each method, the logic for interacting with the database is implemented using the appropriate queries or ORM methods.
Using Repositories:
Repositories are used in other parts of the application, such as services, controllers, or other layers.
In these components, the repositories are imported from the Repositories folder and instantiated to work with the data.
For example, in a user service, the UserRepository can be used to fetch, create, update, or delete users:
  const UserRepository = require('./repositories/UserRepository');

  class UserService {
    constructor(database) {
      this.userRepository = new UserRepository(database);
    }

    async getUserById(id) {
      return this.userRepository.getById(id);
    }

    async createUser(user) {
      return this.userRepository.create(user);
    }

    async updateUser(user) {
      return this.userRepository.update(user);
    }

    async deleteUser(id) {
      return this.userRepository.delete(id);
    }
  }

  module.exports = UserService;
In this example, the UserService imports the UserRepository from the Repositories folder and uses it to perform data access operations related to users.
The Repositories folder provides a structured approach to manage the data access logic in an application. It encapsulates the operations needed to interact with data sources, promoting separation of concerns and modularity. By centralizing data access logic in repositories, it allows for better code organization, reusability, and maintainability of the application.
Services folder
The "Services" folder is a common convention used to organize and store the business logic of an application. The Services folder contains classes or modules that encapsulate specific functionalities or operations related to the application's business rules and operations. Here's a detailed explanation of the Services folder with an example:
Purpose of Services:
Services contain the business logic of an application and handle complex operations or functionalities that go beyond simple data access or manipulation.
They encapsulate the core operations of the application, implement business rules, coordinate different components, and perform high-level operations.
Services promote modularity, separation of concerns, and reusability, allowing for easier testing and maintenance of the application.
Organization in the Services Folder:
The Services folder typically contains individual files, each representing a specific service or a group of related functionalities.
These files may have names that reflect the functionality or domain they represent, such as
UserService.js,PaymentService.js, orEmailService.js.Grouping services in a dedicated folder improves code organization, separation of concerns, and ease of maintenance.
Service Example:
Let's consider an example where the Services folder contains a file named
UserService.js.Inside
UserService.js, the service class or module can be defined to handle operations related to users:class UserService { constructor(userRepository, emailService) { this.userRepository = userRepository; this.emailService = emailService; } async registerUser(user) { // Business logic to register a new user // Example: const createdUser = await this.userRepository.create(user); // ... additional logic // ... send a welcome email using this.emailService.sendWelcomeEmail(createdUser.email); // ... return createdUser; } async deleteUser(userId) { // Business logic to delete a user // Example: await this.userRepository.delete(userId); // ... additional logic // ... return success or error message } async updateUser(userId, updatedData) { // Business logic to update a user // Example: await this.userRepository.update(userId, updatedData); // ... additional logic // ... return updated user or error message } } module.exports = UserService;In this example, the
UserServiceclass is defined, which takes dependencies such as auserRepositoryand anemailServiceas constructor parameters.The class contains methods that implement the business logic related to user operations, such as
registerUser,deleteUser, andupdateUser.Inside each method, the service class can orchestrate interactions with other components, perform validations, and apply the necessary business rules.
Using Services:
Services are used in other parts of the application, such as controllers, routes, or other layers.
In these components, the services are imported from the Services folder and instantiated to perform specific business operations.
For example, in a user controller, the UserService can be used to handle user-related operations:
  const UserService = require('./services/UserService');

  class UserController {
    constructor(userService) {
      this.userService = userService;
    }

    async register(req, res) {
      const userData = req.body;
      try {
        const createdUser = await this.userService.registerUser(userData);
        res.status(201).json(createdUser);
      } catch (error) {
        res.status(500).json({ message: 'User registration failed.' });
      }
    }

    async delete(req, res) {
      const userId = req.params.id;
      try {
        await this.userService.deleteUser(userId);
        res.status(204).send();
      } catch (error) {
        res.status(500).json({ message: 'Failed to delete user.' });
      }
    }

    // Other controller methods...
  }

  module.exports = UserController;
In this example, the UserController imports the UserService from the Services folder and uses it to handle user-related operations in the controller's methods.
The Services folder provides a structured approach to manage the business logic of an application. It encapsulates complex operations, implements business rules, and orchestrates interactions between different components. Services promote modularity, separation of concerns, and code reusability, making the application more maintainable and testable.
Routes folder
The "Routes" folder is a common convention used to organize and store the routing logic of an application. The Routes folder contains files that define the routes, endpoints, and corresponding handlers for handling incoming HTTP requests. Here's a detailed explanation of the Routes folder with an example:
Purpose of Routes:
Routes define the API endpoints or URLs that clients can access to interact with the application.
They handle incoming requests, map them to the appropriate handler functions, and send back the corresponding responses.
Routes provide a structured way to define the application's API surface, enabling separation of concerns and modularization of the application's functionalities.
Organization in the Routes Folder:
The Routes folder typically contains individual files, each representing a specific route or group of related routes.
These files may have names that reflect the resource or functionality they represent, such as
users.js,products.js, orauth.js.Grouping routes in a dedicated folder improves code organization, separation of concerns, and ease of maintenance.
Route Example:
Let's consider an example where the Routes folder contains a file named
users.js.Inside
users.js, the route handlers can be defined for handling operations related to users:const express = require('express'); const router = express.Router(); // GET /users router.get('/', (req, res) => { // Logic to retrieve all users // Example: res.json({ users: [/* user objects */] }); }); // GET /users/:id router.get('/:id', (req, res) => { const userId = req.params.id; // Logic to retrieve a specific user by ID // Example: res.json({ user: {/* user object */} }); }); // POST /users router.post('/', (req, res) => { const userData = req.body; // Logic to create a new user // Example: res.status(201).json({ message: 'User created successfully.' }); }); // PUT /users/:id router.put('/:id', (req, res) => { const userId = req.params.id; const updatedData = req.body; // Logic to update a specific user // Example: res.json({ message: 'User updated successfully.' }); }); // DELETE /users/:id router.delete('/:id', (req, res) => { const userId = req.params.id; // Logic to delete a specific user // Example: res.json({ message: 'User deleted successfully.' }); }); module.exports = router;In this example, the
users.jsfile defines the route handlers for various operations related to users.The
express.Router()function is used to create a router object, which enables defining routes specific to the/usersresource.Each route is defined using the router object and specifies the HTTP method (e.g., GET, POST, PUT, DELETE) and the corresponding handler function.
Inside each handler function, the logic for retrieving, creating, updating, or deleting users can be implemented.
Using Routes:
Routes are used in the main server file or in an application entry point to mount the defined routes.
In the main server file, the route files from the Routes folder are imported and mounted to specific base URLs.
For example, in the server file:
  const express = require('express');
  const usersRoutes = require('./routes/users');

  const app = express();

  // Mount the routes
  app.use('/users', usersRoutes);

  // Additional routes and configurations...

  // Start the server
  app.listen(3000, () => {
    console.log('Server started on port 3000');
  });
In this example, the
usersRoutesimported from the Routes folder is mounted to the/usersbase URL usingapp.use().All routes defined in the
users.jsfile will be accessible under the/userspath (e.g.,/users,/users/:id).
The Routes folder provides a structured approach to define and handle API endpoints or routes in an application. It separates the routing logic from the main server file, promoting code organization, separation of concerns, and modularity. By defining routes in separate files, it allows for easier maintenance, testing, and scalability of the application's API.
Utils folder
The "Utils" folder is a common convention used to organize and store utility functions or helper modules that provide common functionality across the application. The Utils folder contains reusable code snippets that perform specific tasks or offer general-purpose functionalities. Here's a detailed explanation of the Utils folder with an example:
Purpose of Utils:
Utils provide a centralized location for storing commonly used functions, helper modules, or utilities.
They encapsulate reusable code snippets that perform specific tasks or offer general-purpose functionalities.
Utils promote code reusability, reduce code duplication, and enhance the maintainability and readability of the application.
Organization in the Utils Folder:
The Utils folder typically contains individual files, each representing a specific utility function or a related group of utility functions.
These files may have names that reflect the functionality or domain they represent, such as
StringUtils.js,DateUtils.js, orHttpUtils.js.Grouping utility functions in a dedicated folder improves code organization, separation of concerns, and ease of maintenance.
Utility Function Example:
Let's consider an example where the Utils folder contains a file named
StringUtils.js.Inside
StringUtils.js, utility functions related to string manipulation and formatting can be defined:const capitalize = (str) => { // Capitalize the first letter of a string return str.charAt(0).toUpperCase() + str.slice(1); }; const truncate = (str, maxLength) => { // Truncate a string to a specified maximum length and append ellipsis if necessary if (str.length > maxLength) { return str.slice(0, maxLength) + '...'; } return str; }; module.exports = { capitalize, truncate };In this example, the
StringUtils.jsfile defines utility functions for string manipulation.The
capitalizefunction capitalizes the first letter of a given string.The
truncatefunction truncates a string to a specified maximum length and appends ellipsis if necessary.The utility functions are defined as regular functions and exported as an object containing the functions.
Using Utility Functions:
Utility functions can be imported from the Utils folder and used across different parts of the application.
For example, in a controller or service:
  const StringUtils = require('./utils/StringUtils');

  const title = 'hello world';
  const capitalizedTitle = StringUtils.capitalize(title);
  console.log(capitalizedTitle); // Output: Hello world

  const content = 'Lorem ipsum dolor sit amet, consectetur adipiscing elit.';
  const truncatedContent = StringUtils.truncate(content, 20);
  console.log(truncatedContent); // Output: Lorem ipsum dolor sit...
In this example, the StringUtils module is imported from the Utils folder, and the utility functions are used to capitalize a title and truncate content.
The Utils folder provides a structured approach to manage and organize utility functions or helper modules. It promotes code reusability, separation of concerns, and modularity in an application. By centralizing commonly used functions in the Utils folder, it allows for easy access, reduces code duplication, and enhances the overall maintainability and readability of the codebase.
Conclusion
The MVC (Model-View-Controller) architecture provides a robust and scalable approach to designing and developing applications. By dividing the application into three interconnected components – the Model, View, and Controller – MVC promotes separation of concerns, code reusability, and maintainability. The Model represents the data and business logic, the View handles the presentation and user interface, and the Controller orchestrates the interaction between the Model and View.
The "Utils" folder houses reusable utility functions that provide common functionalities, enhancing code organization and reducing duplication. The "Services" folder encapsulates the application's business logic, enabling complex operations and enforcing business rules. The "Routes" folder defines the API endpoints and routes, mapping incoming requests to appropriate handlers for processing. The "Repositories" folder centralizes data access and manipulation logic, providing an abstraction layer between the application and the data sources.
With the "Middleware" folder, we can handle request preprocessing, authentication, and other cross-cutting concerns effectively. The "Migration" folder simplifies managing database schema changes and allows for easy migration between different database states. The "Config" folder provides a centralized location for configuration files, enhancing the application's flexibility and scalability.
By adhering to these architectural and folder structures, developers can create well-organized, modular, and maintainable Node.js applications. These practices not only improve development efficiency but also contribute to the overall performance, extensibility, and longevity of the application.
Adopting the MVC architecture with the appropriate folder structures in Node.js fosters clean code separation, enhances code reuse, simplifies maintenance, and promotes collaboration among developers. By leveraging these principles and patterns, developers can build scalable, reliable, and feature-rich applications that stand the test of time.
Writer's Message
I encourage you to apply the knowledge gained from this blog to your future projects. Embrace the beauty of well-organized code, thoughtful separation of concerns, and the power of reusable utility functions. By doing so, you will embark on a path that leads to cleaner, more maintainable codebases and more joyful development experiences.
Thank you for joining me on this exploration of the MVC architecture and folder structures in Node.js. May your coding endeavors be filled with creativity, innovation, and the joy of building remarkable applications.
for code refer:https://github.com/Amandeepsingh25/MVC_Blog
Happy coding!!

.
.
.
Amandeep Singh