Unlocking Effortless Data Management: Building Your First ORM-Infused CRUD API

📜 A Primer Before You Begin: Understanding MVC Architecture
Greetings, Fellow Developers,
Before delving into the intricacies of building a robust CRUD API using ORM, it's paramount to ensure that our foundation is solid. As we embark on this journey together, let's take a moment to familiarize ourselves with the bedrock of modern software development: the Model-View-Controller (MVC) architecture.
🔗 Explore the Full MVC Architecture Guide Here
Introduction
In the world of software development, efficient data management is paramount to the success of applications and systems. Object-Relational Mapping (ORM) has emerged as a powerful solution to bridge the gap between the object-oriented programming paradigm and relational databases. By providing a seamless interface between application code and database operations, ORM simplifies the complexities of data manipulation, retrieval, and storage.
This article delves into the fundamentals of ORM and its significance in modern software development. We will explore how ORM technology enables developers to interact with databases using familiar object-oriented programming constructs, abstracting away the intricacies of SQL queries and relational schema. Additionally, we will delve into the concept of CRUD operations (create, Read, Update, and delete), which form the cornerstone of data management, and see how ORM systems streamline the execution of these operations through intuitive APIs.
Whether you are a seasoned developer looking to enhance your database management skills or a newcomer seeking to understand the intricacies of data handling, this article will provide valuable insights into the world of ORM and guide you through the practical utilization of CRUD APIs for efficient and maintainable data manipulation.
What is ORM?

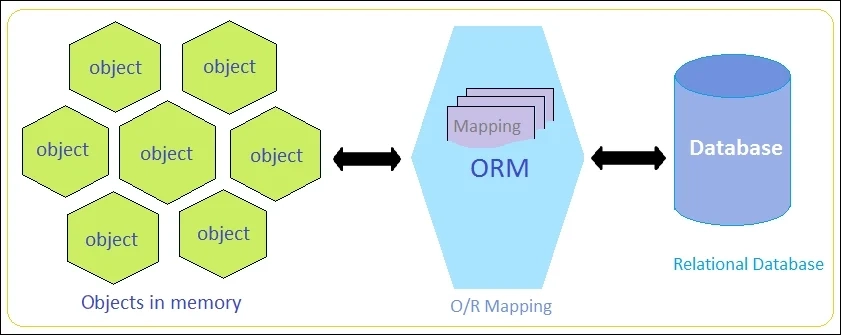
Object-Relational Mapping (ORM) is a sophisticated approach in software development that serves as a bridge between the object-oriented programming world and relational databases. At its core, ORM seeks to harmonize the inherently distinct structures of objects, prevalent in programming languages like Java, Python, or C#, with the tabular architecture of relational databases like MySQL, PostgreSQL, or Oracle.
In the conventional paradigm of database interaction, developers must manually craft SQL queries to manipulate data within databases. This process involves a deep understanding of the database schema, SQL syntax, and the specifics of data retrieval, update, insertion, and deletion. However, ORM introduces a layer of abstraction that remarkably simplifies these intricate aspects.
When using ORM, developers first define classes in their programming language to represent entities within their application. These classes encapsulate data attributes and behaviors related to the entity. For instance, in a banking application, a "Customer" class might have attributes like "name," "email," and "account_balance," along with methods for depositing and withdrawing funds.
The magic of ORM becomes evident as these application-specific classes are mapped to corresponding database tables. The ORM framework facilitates this mapping by understanding the relationships between the classes and their database counterparts. This connection is established through configuration files or annotations within the code.
ORM frameworks offer a variety of features and benefits:
Query Abstraction: Instead of crafting raw SQL queries, developers interact with the database using high-level, object-oriented queries. These queries are often written in a language that closely resembles the programming language being used, making them more intuitive and readable.
Automatic Query Generation: When an application invokes a query through the ORM framework, it translates the object-oriented query into SQL statements that the database can understand. This alleviates the need for developers to manually generate SQL queries, saving time and reducing the chances of errors.
Relationship Management: ORM systems handle relationships between entities, such as one-to-one, one-to-many, and many-to-many relationships. This abstraction simplifies the handling of complex data structures and enhances the integrity of the data model.
Data Validation and Constraints: ORM frameworks often provide mechanisms to define data validation rules and constraints within the object-oriented classes. This ensures data integrity and consistency in both the application and the database.
Database Portability: As ORM abstracts the database interactions, switching to a different database system becomes less complex. Developers can adapt their applications to different databases without overhauling the codebase.
Maintenance and Testing: ORM aids in maintaining a clear separation between business logic and data storage. This separation enhances maintainability and facilitates unit testing.
It's important to note that while ORM offers numerous advantages, it's not a one-size-fits-all solution. In some cases, particularly with highly optimized or complex queries, direct SQL manipulation might still be preferable. Nonetheless, ORM has revolutionized the development landscape by striking a balance between the object-oriented and relational paradigms, fostering more efficient, maintainable, and adaptable software systems.
Building Basic CRUD API using ORM
Choose an ORM Framework
Choosing Sequelize as ORM Framework
Choosing Sequelize as Your ORM Framework
In the realm of Node.js development, when the task of bridging the gap between application code and database operations arises, Sequelize emerges as a compelling solution. With its comprehensive features and seamless integration, Sequelize has garnered widespread acclaim as an effective and versatile Object-Relational Mapping (ORM) framework. Let's delve into the reasons why Sequelize might be the ideal choice for your project:
Node.js Compatibility: As a promise-based ORM tailored specifically for Node.js, Sequelize aligns perfectly with the asynchronous nature of the language. This compatibility ensures efficient and non-blocking interactions between your application and the database.
Multi-Database Support: Sequelize offers robust support for various relational databases, including MySQL, PostgreSQL, SQLite, and Microsoft SQL Server. This flexibility empowers you to select the database that best suits your project's requirements.
Feature-Rich Querying: With Sequelize, intricate querying becomes a breeze. Its rich set of query options and operators empowers you to execute complex queries while abstracting away the underlying SQL syntax intricacies.
Model-Driven Approach: Sequelize promotes a model-driven approach, allowing you to define your data models as JavaScript classes. These models encapsulate data attributes, relationships, and business logic, making your codebase more organized and maintainable.
Associations and Relationships: The framework simplifies the establishment of associations between different models, be it one-to-one, one-to-many, or many-to-many relationships. This level of abstraction reduces complexity and enhances the comprehensibility of your code.
Schema Migrations: Sequelize facilitates seamless schema migrations, which are vital when the structure of your database evolves over time. It automates the process of updating the database schema without manual intervention.
Transactions and Error Handling: The framework offers transaction management, ensuring data integrity during complex operations. Furthermore, Sequelize provides robust error handling mechanisms, improving the overall reliability of your application.
Active Community and Documentation: Sequelize boasts an active and vibrant community, resulting in thorough documentation, tutorials, and a wealth of resources. This support ecosystem accelerates your learning curve and assists in overcoming potential roadblocks.
Extensibility: If Sequelize's out-of-the-box capabilities don't entirely align with your needs, the framework's extensibility allows you to develop custom plugins or hooks to tailor its behavior to your application's requirements.
Ecosystem Integration: Given its popularity within the Node.js community, Sequelize seamlessly integrates with various Node.js libraries and frameworks, enhancing its compatibility with your existing technology stack.
As you embark on the journey of selecting an ORM framework, consider Sequelize's prowess in harmonizing Node.js with relational databases. With its extensive features, robust documentation, and vibrant community, Sequelize stands as a formidable contender, ensuring your application's database interactions are not just efficient, but also maintainable and scalable.
Using my previous MVC_Blog repo to learn how to install Sequelize in your repository and create a database using ORM.
You can have the repo from the provided link https://github.com/Amandeepsingh25/MVC_Blog.git
Now we move towards Installation and creating the CRUD API.
Installing Sequelize with MySQL and Using Sequelize CLI
Sequelize is a powerful Object-Relational Mapping (ORM) framework that simplifies database interactions in Node.js applications. To set up Sequelize with MySQL using the Sequelize CLI, follow these steps:
Step 1: Install Sequelize and Sequelize CLI
- Install Sequelize and Sequelize CLI: Install the Sequelize library and the Sequelize CLI globally using the following commands:
npm install sequelize sequelize-cli
- Install Sequelize Locally: Install Sequelize as a local dependency in your project directory:
npm install sequelize
Let us go through what is Sequelize CLI.
Here are some key points regarding the Sequelize CLI:
Command-Line Interface (CLI): Sequelize CLI is a command-line tool that simplifies the process of working with Sequelize ORM. It offers commands for creating models, migrations, seeders, and more.
Installation: Sequelize CLI can be installed globally using npm. This allows you to access the CLI commands from anywhere in your terminal.
Project Initialization: You can initialize Sequelize in your project directory using the command
sequelize init. This generates the necessary directory structure and configuration files.Configuration: The CLI generates a
config/config.jsonfile, which holds database configuration for different environments like development, production, and testing. You can define database connection details such as username, password, database name, host, and dialect (e.g., MySQL, PostgreSQL).Generating Models: The
sequelize model:generatecommand helps create models along with their associated migration and seed files. Models define the structure of your data and its relationships.Migrations: Migrations are scripts that help manage changes to the database schema over time. The
sequelize db:migratecommand applies pending migrations to the database, ensuring that the schema is up to date.Seeds: Seeds are scripts that populate the database with initial data for testing and development. The
sequelize db:seedcommand is used to execute seeders.Associations: The CLI assists in creating associations between models using commands like
sequelize model:associate. This simplifies the process of defining relationships like one-to-one, one-to-many, and many-to-many.Undoing Migrations and Seeds: The CLI provides commands to undo migrations and seeds, allowing you to roll back changes if needed.
Running Commands: Most Sequelize CLI commands follow the format
sequelize <command>. You can also use shorthand forms, such assequelize db:migrateorsequelize db:seed.Customization: The CLI-generated files are templates that you can customize to suit your project's needs. You can modify models, migrations, and seeders based on your application requirements.
Version Control: Migrations and seed files generated by Sequelize CLI are designed to be version-controlled. This ensures that changes to the database schema are tracked and can be applied consistently across different environments.
Documentation: The official Sequelize documentation provides in-depth explanations of each CLI command, along with usage examples and best practices.
Error Handling: The CLI provides informative error messages to help troubleshoot issues during command execution.
Community and Support: Since Sequelize is widely used, the CLI benefits from an active community that offers support, tutorials, and resources to guide users through various scenarios.
The Sequelize CLI is a valuable companion for developers working with the Sequelize ORM, streamlining the database management process and improving productivity.
You can learn more about Sequelize CLI using its documentation.
https://github.com/sequelize/cli
https://sequelize.org/docs/v6/getting-started/
These are the resources that can make your ORM journey with the sequelize easy.
Step 2: Setting up for the Project
Creating a Bank Details Database Setup Using Sequelize CLI
In this scenario, let's assume you're building a system to manage bank account details. You'll use Sequelize and the Sequelize CLI to set up the database and define the necessary models. Here's a step-by-step guide:
Configure Sequelize
- Initialize Sequelize: Generate the Sequelize configuration file:
npx sequelize-cli init
What does npx sequelize init actually do?
The sequelize init command is a crucial step when setting up a project that uses Sequelize, as it initializes the project structure and generates the necessary configuration files for working with the Sequelize ORM. Let's delve into the details of what this command does:
Project Initialization: When you run
sequelize init, the command creates a few essential directories and configuration files that are essential for configuring and managing your Sequelize project.Directory Structure: The command creates a set of directories within your project's root directory:
config: This directory contains the configuration file (
config.json) where you define database connections for different environments (development, production, testing).models: This directory is where you'll define your Sequelize models. Models represent tables in your database and encapsulate the structure of your data.
migrations: Migrations are scripts that help manage changes to the database schema over time. This directory will hold the migration files that are generated when you create new models or make changes to existing ones.
seeders: Seeders are scripts that populate your database with initial data. This directory will be used to store seed files that you can use to insert sample data into your database.
Edit Configuration: Open
config/config.jsonand configure the development database connection for MySQL:
{
  "development": {
    "username": "your_username",
    "password": "your_password",
    "database": "bank_details_db",
    "host": "127.0.0.1",
    "dialect": "mysql"
  }
  // ... other environments
}
Set up the configuration file, enter the username and password of your MySQL account, and connect them. Enter the name of the database that you would like to define.
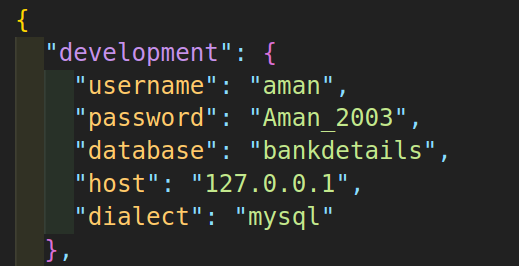
This is my configuration file Setup for this basic CRUD API project
Step 3: Create Models
Generating models is a fundamental step in setting up a database-driven application using Sequelize ORM. Sequelize CLI offers a convenient way to create models, along with their associated migration and seed files. Here's a detailed explanation of what happens when you generate a model using Sequelize CLI:
Command Execution:
When you execute a command like
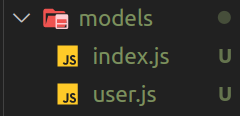
npx sequelize-cli model:generate --name User --attributes name:string,balance:integer, Sequelize CLI interprets this command to generate a model namedUserwith attributesnameandemailModel File Creation: The CLI starts by creating a new JavaScript file named
user.jsinside themodelsdirectory (if it doesn't already exist). This file serves as the blueprint for yourUsermodel.
The below code will be generated on

Attributes Definition:
Inside the generated
user.jsmodel file, Sequelize CLI inserts boilerplate code that defines your model's attributes and their corresponding data types. For instance, in the example command, it adds definitions fornameandbalanceattributes with their respective data types (STRINGandINTEGER).Associations and Methods:
Depending on your application's needs, you might manually edit the generated model file to include associations with other models (like one-to-many relationships) and custom methods.
Migration File Creation:
Alongside generating the model file, the CLI also creates a migration file in the
migrationsdirectory. This migration file contains instructions for altering the database schema to include the newly definedUsermodel with its attributes.Migration File Contents:
The migration file contains two main functions:
upanddown. Theupfunction describes the changes to be made to the database schema to create theUsertable. It includes details about the attributes' data types, constraints, and any other relevant settings. Thedownfunction defines how to revert these changes (e.g., drop theUsertable).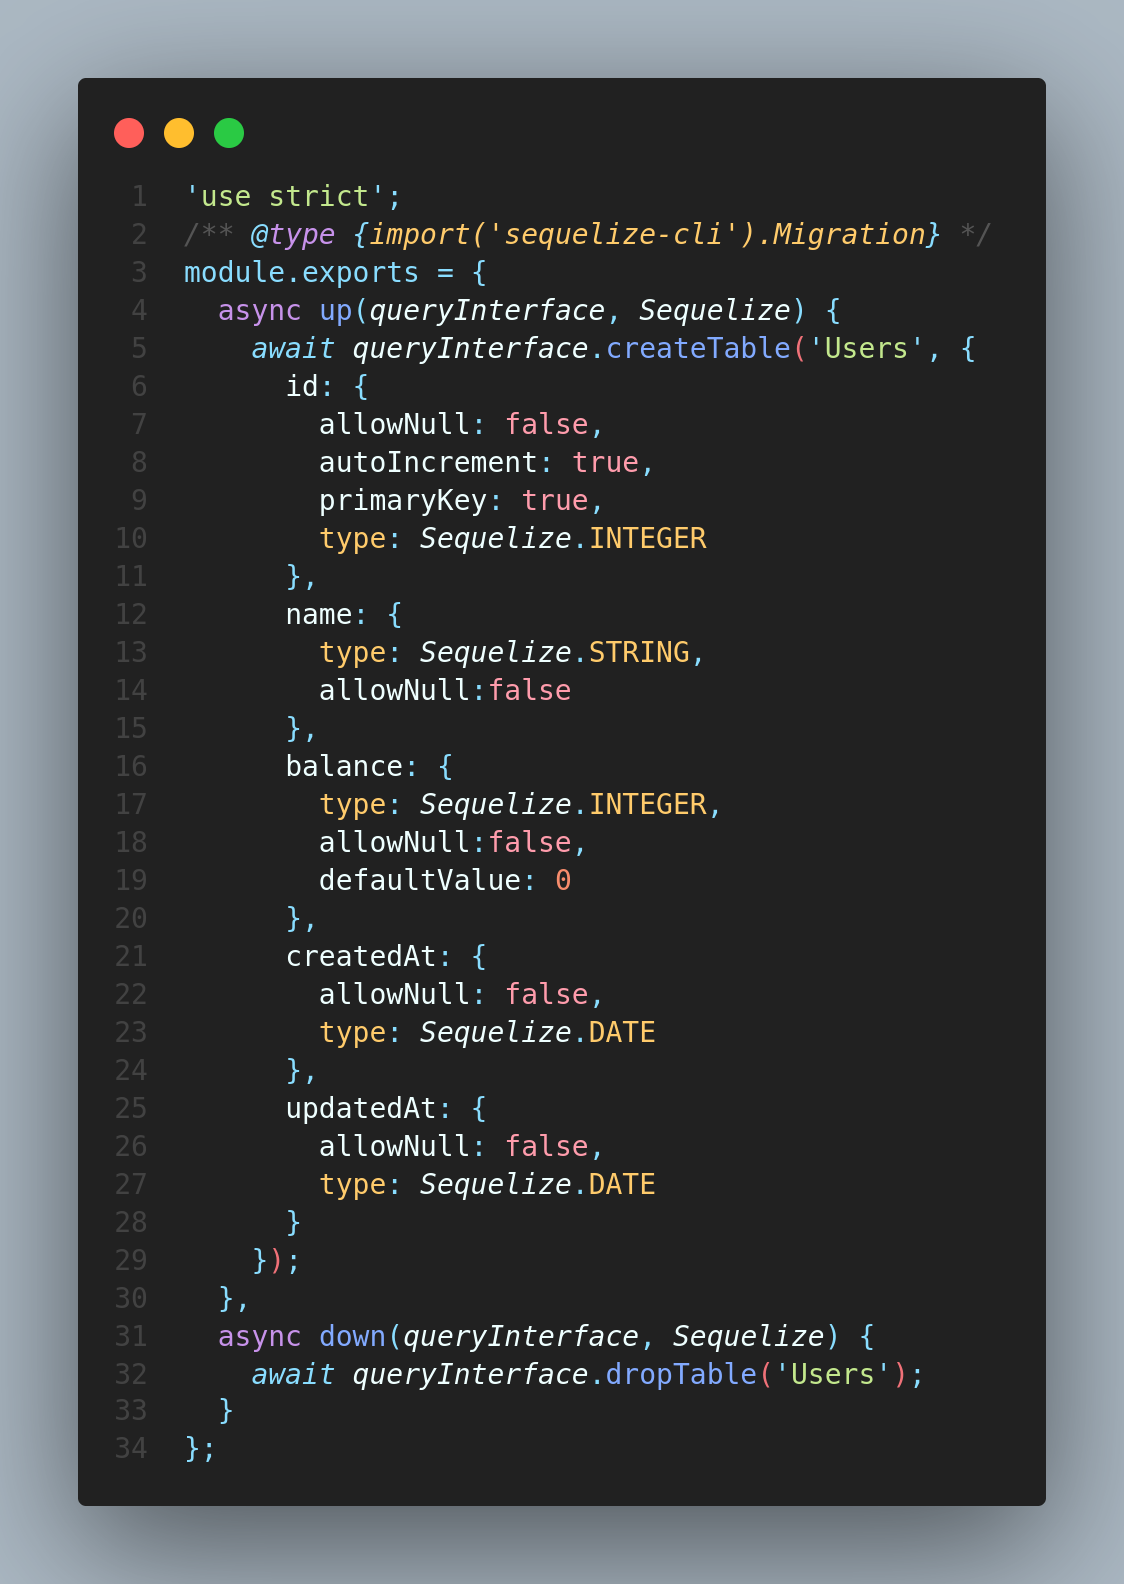
Running Migrations:
After generating the migration file, you need to apply it to your database to make the schema changes. Running
npx sequelize-cli db:migrateexecutes all pending migrations, which creates theUsertable in the database with the specified attributes.
By performing the following steps database has been created now you can check your SQL, and your database and table have been created.
Step 4: Create the Database
With your Sequelize models and configurations in place, the next pivotal step is to create the database that will store your application's data. Sequelize simplifies this process by allowing you to generate the required tables based on your defined models. Let's delve into how to create the database using Sequelize.
Running Migrations: Migrations are scripts that define changes to the database schema over time. They include instructions to create, modify, or delete tables and their attributes. To bring your defined models into fruition as actual database tables, you'll use migrations.
Executing Migrations: Using the Sequelize CLI, you can execute migrations with the
sequelize db:migratecommand. This command scans your migration files and applies any pending changes to the database.Database Table Creation: When you run the migration command, Sequelize translates your model definitions and attributes into SQL statements that create the necessary database tables. This process harmoniously transforms your code-based representations into structured storage entities.
Ensuring Data Integrity: Migrations are designed to be executed in a sequence, ensuring the integrity of your database. If you add a new model or modify an existing one, generating a new migration file and running
db:migratealigns your database with the latest changes.Version Control for Database Schema: Migrations serve as a version control mechanism for your database schema. Each migration corresponds to a step in your application's development, allowing you to track changes and revert to previous states if needed.
Reverting Migrations: In case you encounter issues or need to backtrack, Sequelize provides a way to revert migrations using the
sequelize db:migrate:undocommand. This command executes thedownfunction in the most recent migration, effectively undoing the changes it made.
Creating the database using Sequelize migrations ensures that your application's data structure remains synchronized with your models' definitions. The process promotes a consistent database schema, version-controlled changes, and reliable initial data for testing. By understanding the significance of migrations, you're better equipped to manage your application's evolving data needs effectively.
Step 5: Implement CRUD Operations
As your application evolves, the ability to manage your data efficiently becomes paramount. Sequelize, combined with the repositories pattern, offers a robust solution for implementing Create, Read, Update, and Delete (CRUD) operations. In this step, we'll explore how to leverage these tools to interact with your database seamlessly.
1. Understanding the Repositories Pattern:
The repositories pattern is a structural approach that encapsulates data access logic within dedicated repository classes. This pattern centralizes database interactions, promoting maintainability, readability, and reusability. By utilizing the repositories pattern, you abstract away the complexity of database operations from your application's business logic.
2. Implementing CRUD Operations:
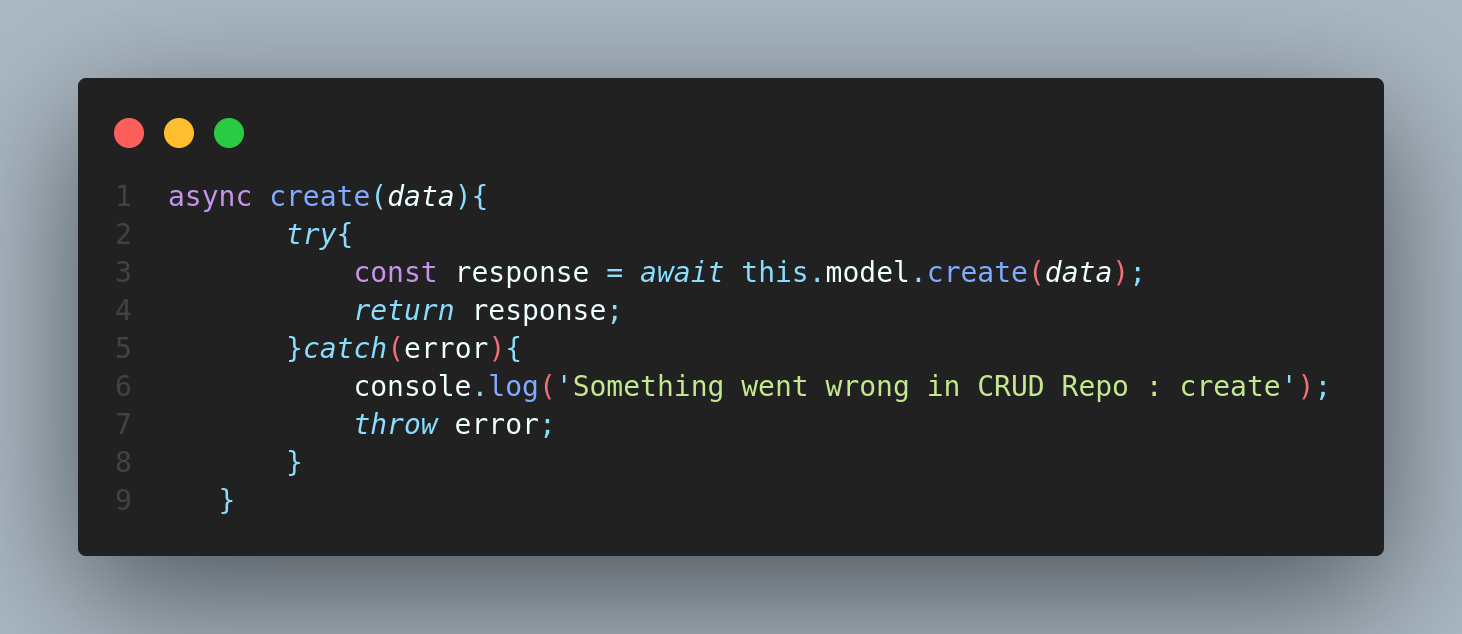
creating the class repository for performing the CRUD operations.

Create Operation (Create Repository): For instance, to create a new blog post, you can define a
PostRepositoryclass that encapsulates the logic for creating a new record in thePosttable. This class would utilize the Sequelize model'screatemethod to insert data.
Read Operations (Read Repository): To retrieve data, create a
ReadRepositorythat handles querying the database. For instance, fetching all blog posts or retrieving a single post by its ID can be encapsulated within this repository

Update Operation (Update Repository): When updating records, implement an
UpdateRepositorythat handles updating specific attributes of a record. This repository can use Sequelize'supdatemethod to modify existing data.

Delete Operation (Delete Repository): Deleting records can be managed through a
DeleteRepository. This repository would use Sequelize'sdestroymethod to remove data from the database.

3. Benefits of the Repositories Pattern:
Separation of Concerns: The repositories pattern enforces a clear separation between data access logic and application logic, making your codebase more organized and maintainable.
Testability: Repositories can be unit-tested without requiring an active database connection. You can easily mock repository methods for testing purposes.
Reusability: By encapsulating database operations in repositories, you can reuse these operations across different parts of your application.
Flexibility: The pattern enables you to swap out the underlying database technology or ORM without significantly impacting your application logic.
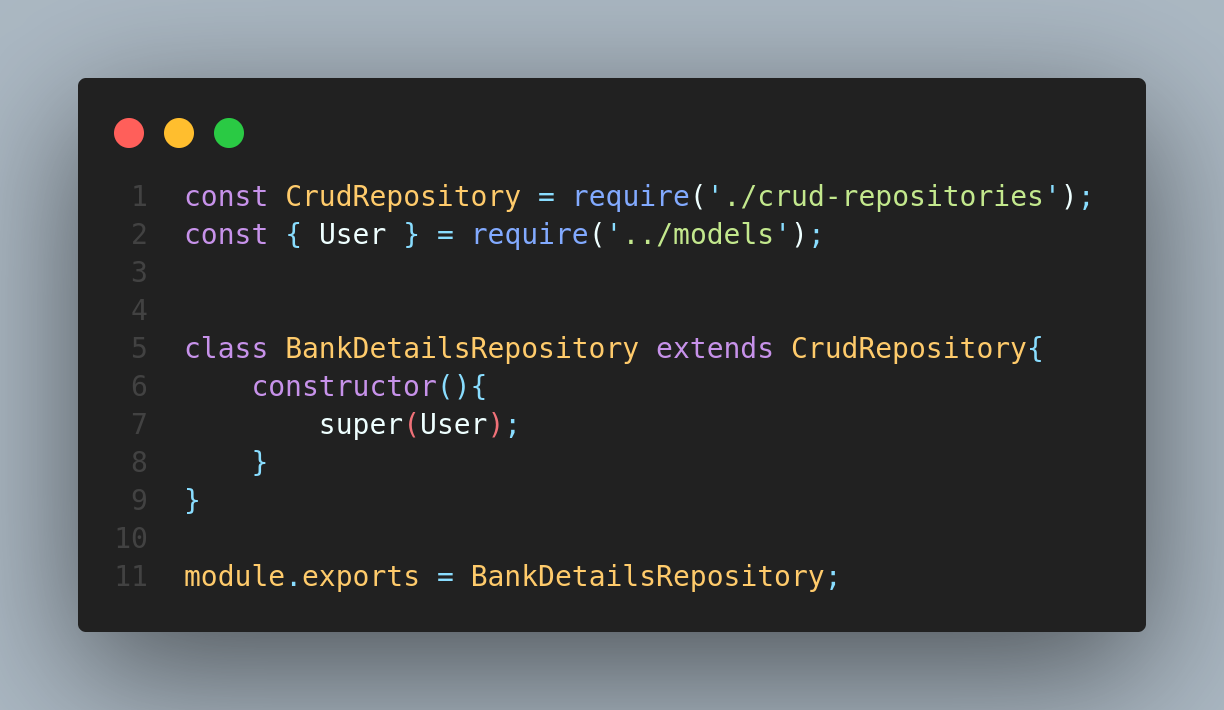
Now passing the value through the constructor by creating a new file index.js
Step 6: Creating the Business logic
In a well-structured application, the separation of concerns is key to maintaining code clarity and modularity. The services pattern, coupled with Sequelize, helps you achieve this goal by encapsulating business logic within specialized service classes. Here's how you can craft a service using the provided code snippet:
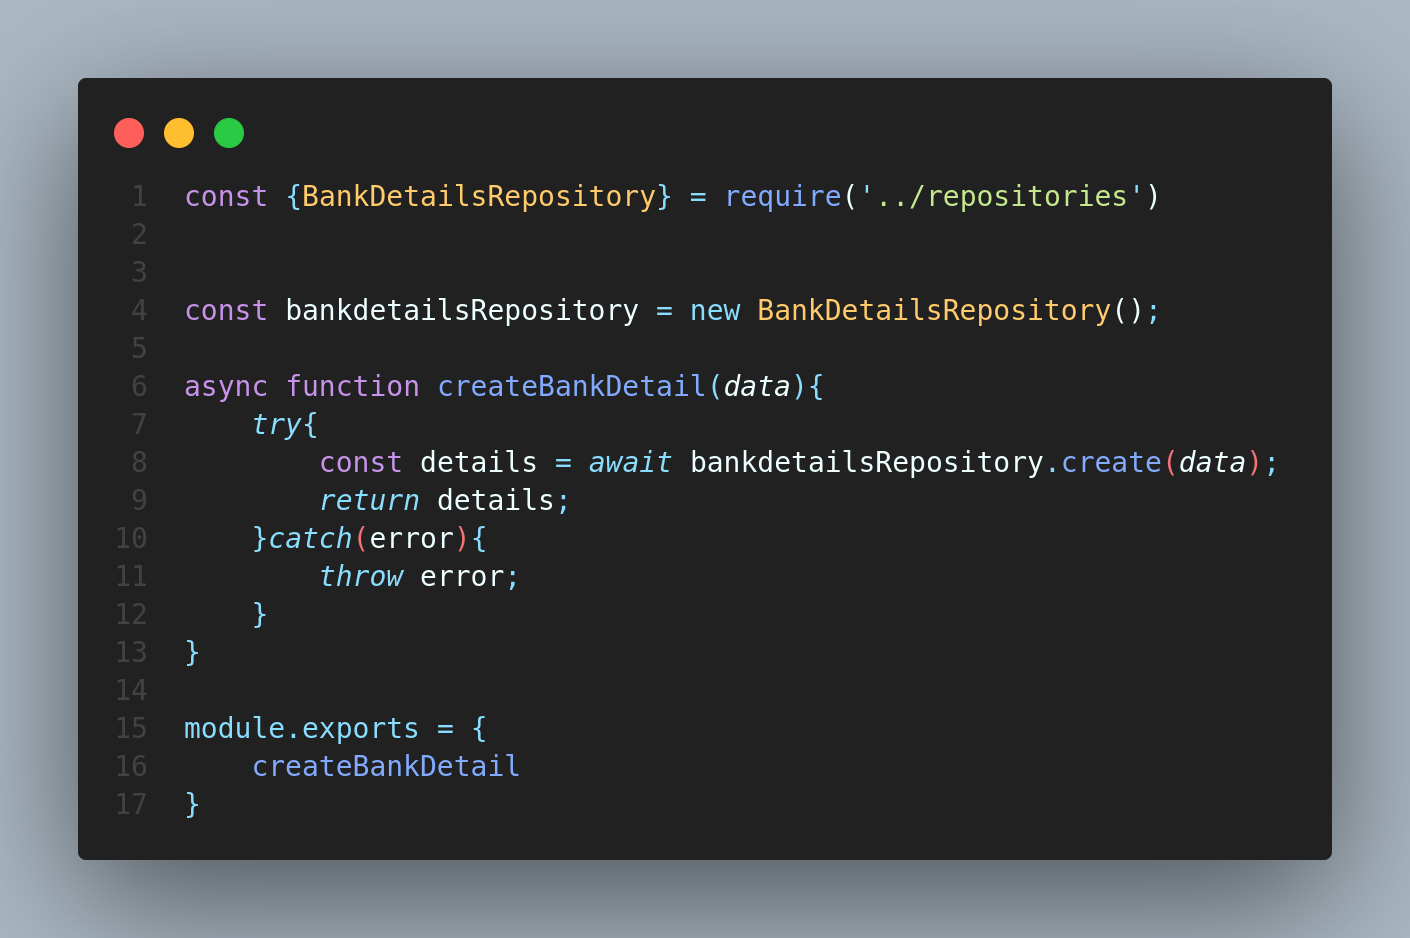
importing Repository: You import the
BankDetailsRepositoryfrom the../repositoriesdirectory to gain access to database operations.Creating Repository Instance: You create an instance of
BankDetailsRepository. This instance will allow you to perform CRUD operations on bank details.Service Method:
createBankDetailis a service method responsible for creating bank details. It takes in the necessary data as a parameter.Utilizing Repository: Inside the service method, you use the repository instance (
bankdetailsRepository) to create a new bank detail by calling itscreatemethod.Error Handling: You wrap the repository operation in a
try...catchblock. If an error occurs during the operation, you catch the error and rethrow it to be handled further up the call stack.Exporting Service: Finally, you export the
createBankDetailservice method so that other parts of your application can use it.
By following the services pattern and utilizing Sequelize, you've separated your application's business logic from its database operations. This approach enhances maintainability, testability, and overall code quality. Your service methods, such as createBankDetail, serve as the core logic for handling specific actions, promoting a cleaner and more organized codebase. This pattern allows your application to scale efficiently and remain adaptable to future changes.
Step 7: Implementing Controller Logic with the Services Pattern
In modern web applications, a well-structured and error-handling-capable controller plays a crucial role in maintaining a smooth interaction between the client and the server. The code snippet you provided demonstrates a solid example of a controller that adheres to best practices by employing the services pattern, HTTP status codes, and error handling. Let's explore how this controller works and how it enhances the professionalism of your application.

Importing Service and Libraries: You import the
BankDetailServicefrom theservicesmodule, as well as theStatusCodesenumeration from thehttp-status-codeslibrary.Controller Method: The
createBankDetailmethod is a controller action responsible for handling HTTP POST requests for creating bank details.Data Extraction: You extract relevant data (
nameandbalance) from the request body, which will be used to create the bank detail.Calling the Service: Using the extracted data, you call the
createBankDetailmethod of theBankDetailServiceto create the bank detail.Sending Success Response: If the service operation is successful, you send a response with a
201 Createdstatus. The response includes a success message, the created bank details, and an empty error object.Error Handling: In case of errors during the process, you catch the error, send a
500 Internal Server Errorresponse, and provide an appropriate error message. The response includes a failure message, an empty data object, and the error details.
Controller for Efficient Request Handling:
Controllers serve as intermediaries between client requests and business logic. By structuring your controllers as demonstrated, you ensure a consistent and organized approach to handling requests and responses.
Incorporating the provided code snippet and best practices, you've created a controller that efficiently handles the process of creating bank details. The code is organized, error handling is robust, and responses are tailored to inform clients about the status of their requests. By following these guidelines, you contribute to a maintainable and professional application architecture that delivers a seamless experience to users and developers alike.
Step 8: Developing API Endpoints with Routes for Seamless CRUD Operations
Creating API endpoints is a critical step in building a functional web application. These endpoints serve as the entry points for clients to interact with your application's functionality. By connecting the dots between routes, controllers, services, and models, you can achieve a fully functional CRUD API. Let's explore how to create API endpoints using the routes folder and perform the necessary linking operations for smooth CRUD operations.
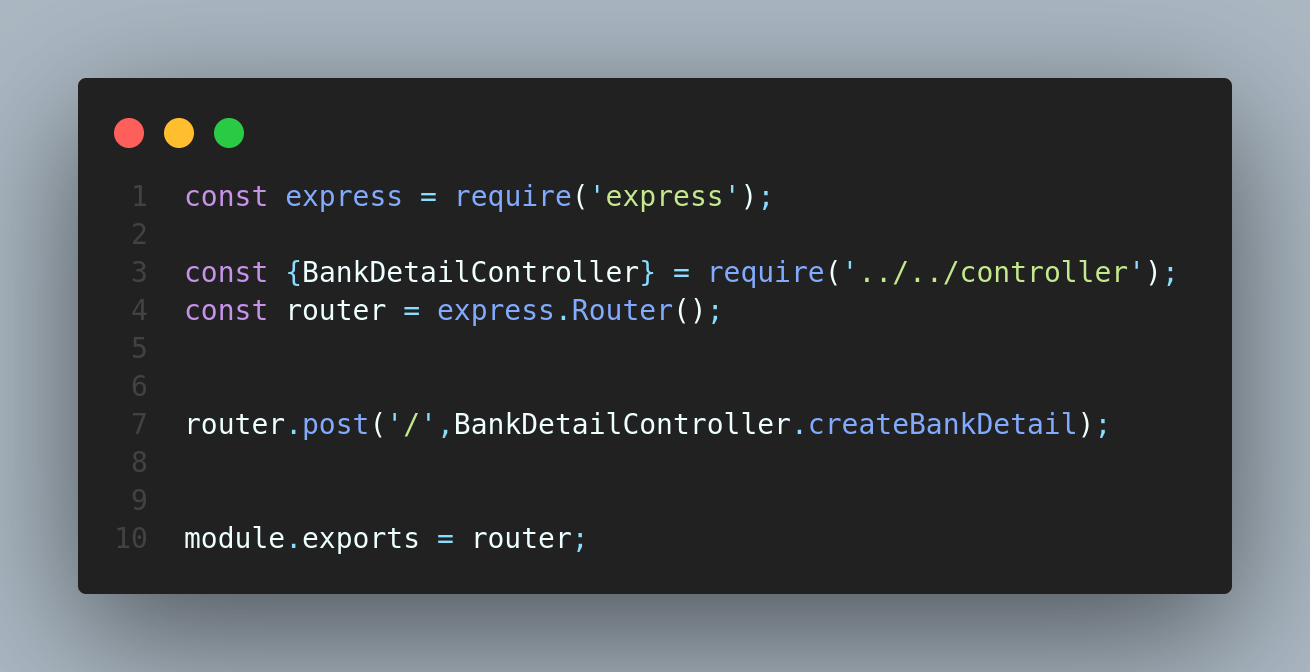
1. Routes and Endpoint Mapping:
API endpoints are mapped to specific routes in your application. Each route corresponds to a unique URL that clients can use to send requests. Let's create routes that handle various CRUD operations for bank details:
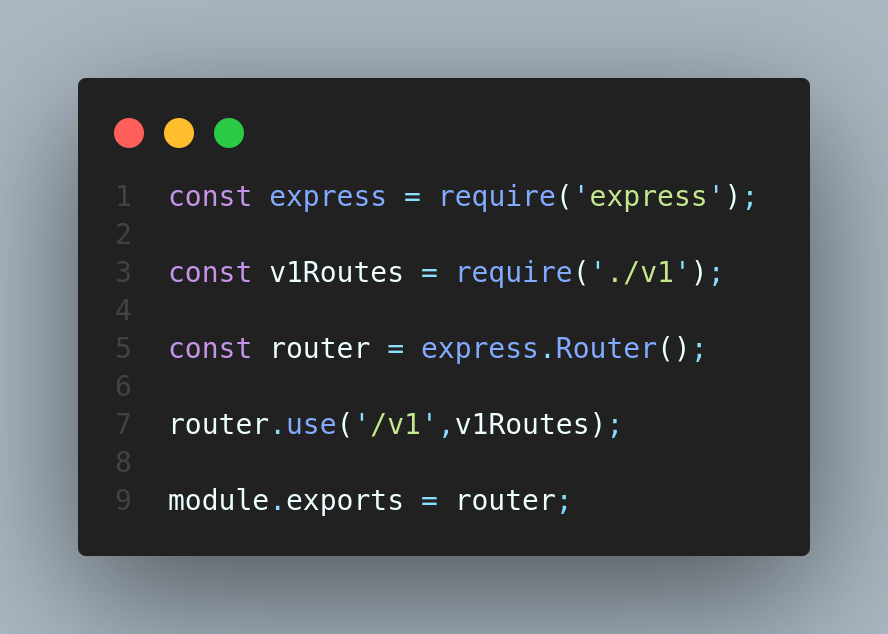
We are versioning all this using a folder v1 so index.js file in that system will be set up like that in future, If we want to update our request, we will just update the version folder.
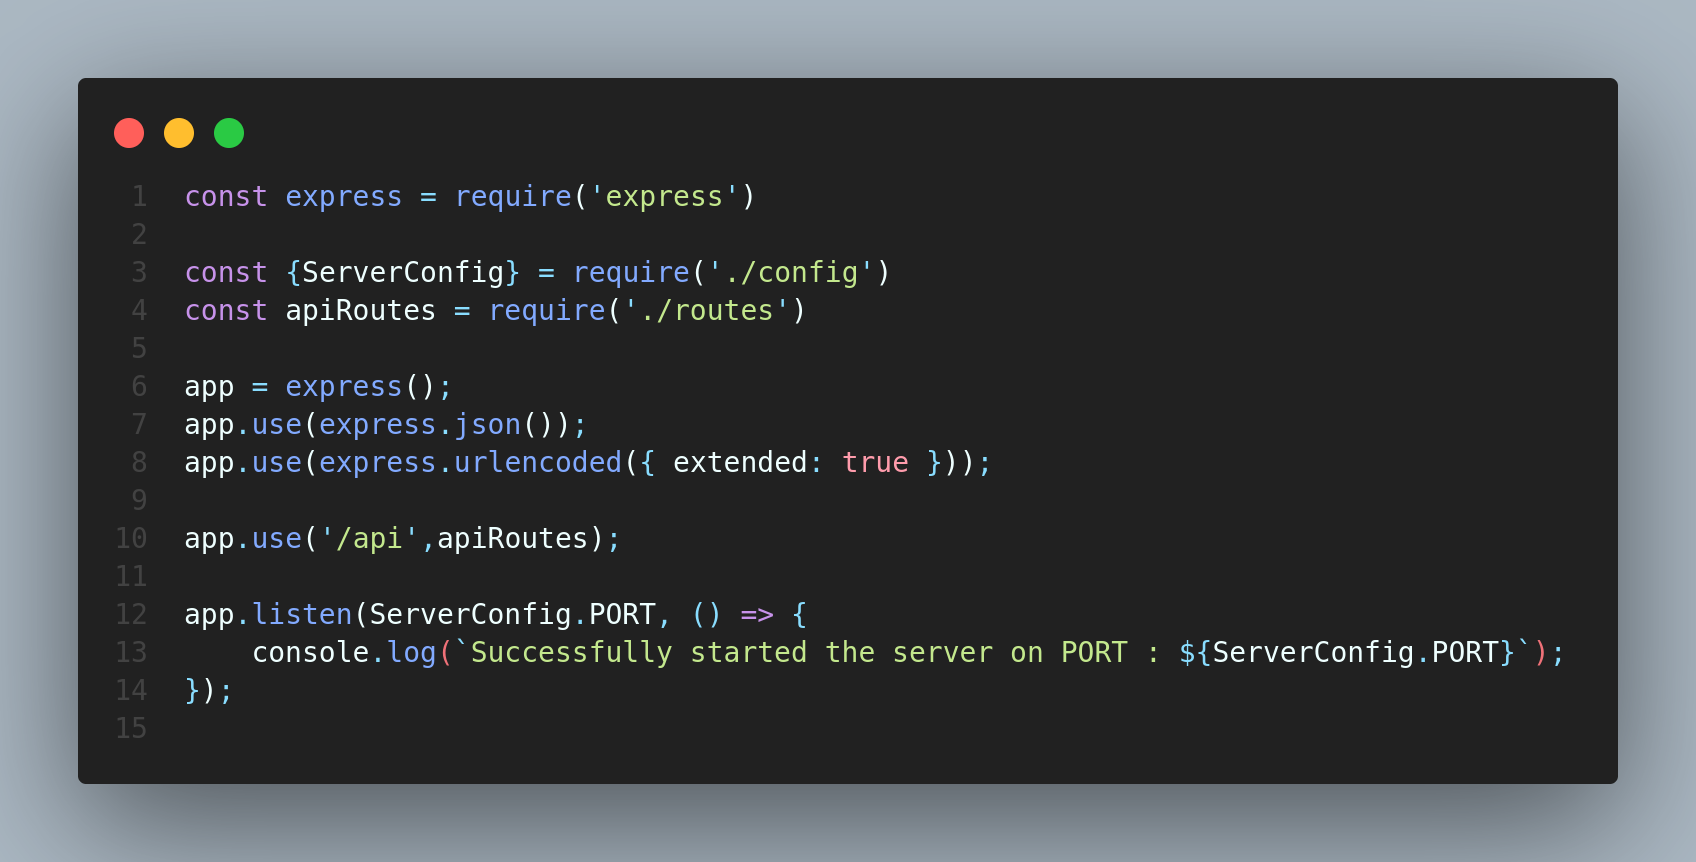
this is where apiRoutes will point from the above code

Developing API endpoints using routes, controllers, services, and models is a comprehensive process that ties together various parts of your application. By mapping URLs to specific actions, you create a clear and structured way for clients to interact with your application's functionality. This step completes the foundation of your CRUD API, enabling clients to create, read, update, and delete data seamlessly.
Step 9: Test Your API
After setting up your CRUD API with routes, controllers, services, and models, the next crucial step is to test its functionality using a tool like Postman. Postman allows you to send HTTP requests to your API endpoints and verify that they work as intended. Let's explore how to test your API using Postman and create a blog post about it.
Create (POST) Operation:
Open Postman and create a new request.
Select the HTTP method as POST.
Enter the complete URL for creating a bank detail, including the API base URL and endpoint path.
Set the request body to include required data (e.g.,
nameandbalance).Click the "Send" button to make the POST request and create a bank detail.
start the server that we created using the nodemon, In my case the script name axe used to do this
npm run axe
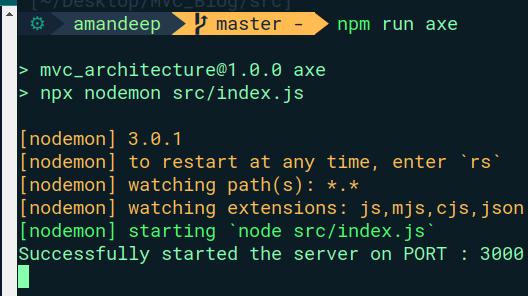
Now, Your server is up.
Now open the POSTMAN app with the localhost address localhost:3000/api/v1/bankdetails created using the routes
Now, attach the data which should be send .

This is the Body we use to send the data.
Press the SEND button Your request will be processed, and if the request is valid then the data will be uploaded.
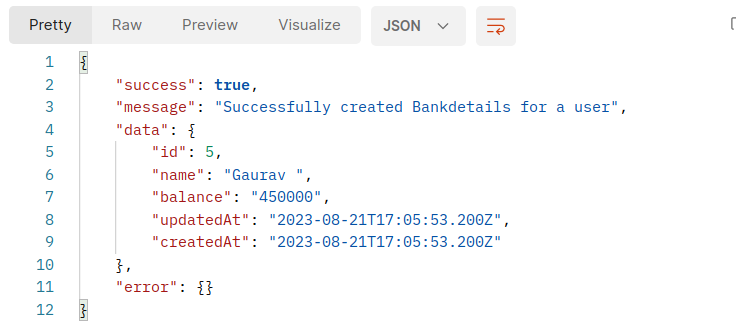
request accepted, now the data has been pushed to the database that you have created using the sequelize and your CRUD API is ready.
Conclusion: The Role of ORM in Modern Development
Conclusion: The Role of ORM in Modern Development
In the realm of modern software development, Object-Relational Mapping (ORM) has emerged as a powerful and indispensable tool. It bridges the gap between the object-oriented programming world and relational databases, offering developers a seamless and efficient way to interact with databases. This conclusion outlines the significance of ORM in modern development and highlights its transformative impact.
Advantages of ORM:
Abstraction and Simplification: ORM frameworks abstract the complexities of SQL queries and database interactions, allowing developers to work with high-level programming constructs. This simplification leads to faster and more productive development cycles.
Productivity: ORM reduces the need for writing repetitive and error-prone SQL queries. This results in faster development, as developers can focus on application logic rather than database intricacies.
Portability: ORM facilitates the creation of database-agnostic applications. Developers can write code that works across multiple database systems without being tied to a specific vendor's syntax.
Maintainability: ORM encourages code organization and adheres to coding patterns. This makes the codebase more maintainable and comprehensible, which is essential for long-term projects.
Security: Many ORM frameworks include built-in security features that guard against common database vulnerabilities, such as SQL injection attacks.
Performance Optimization: Advanced ORM frameworks provide features like lazy loading and caching, which can optimize performance by fetching only the required data and reducing unnecessary database queries.
Choosing the Right ORM:
Selecting the appropriate ORM framework depends on factors such as the programming language, project requirements, performance needs, and the ecosystem of libraries and tools. Commonly used ORM frameworks include Sequelize (JavaScript/Node.js), Hibernate (Java), Entity Framework (C#), and Django ORM (Python).
Considerations and Best Practices:
Data Modeling: Properly designing and modeling your database schema is essential for effective ORM usage. Align your application's data structure with the ORM's capabilities to achieve optimal performance and maintainability.
Performance: While ORM frameworks offer performance optimizations, understanding how they work under the hood is crucial. Profiling queries and optimizing data access patterns can prevent potential performance bottlenecks.
Security: ORM frameworks can provide security features, but it's important to also implement proper input validation and authentication mechanisms to ensure a holistic security approach.
ORM has transformed the way developers interact with databases, making the development process smoother, more efficient, and less error-prone. By abstracting database interactions, ORM frameworks enable developers to focus on building robust applications that align with best practices. In the ever-evolving landscape of software development, ORM remains a cornerstone technology that empowers developers to create sophisticated and data-driven applications while adhering to modern development principles.
Conclusion: Unlocking Effortless Data Management

In the dynamic world of software development, efficiency and precision are paramount. Building applications that seamlessly handle data while adhering to best practices is no longer a luxury; it's a necessity. Throughout this journey, we've explored the concept of Object-Relational Mapping (ORM) and witnessed its transformative power in simplifying data management tasks. As we conclude our exploration in this blog, "Unlocking Effortless Data Management: Building Your First ORM-Infused CRUD API," let's recap the key takeaways and the profound impact ORM has on modern development.
ORM: A Bridge to Productivity and Precision
At its core, ORM serves as a bridge between the object-oriented programming paradigm and the relational database world. This bridge empowers developers to interact with databases using programming constructs that align with their natural workflow. Through the elimination of intricate SQL queries and the abstraction of database complexities, ORM accelerates development cycles, enhances productivity, and fosters precision in code crafting.
Elevating Your CRUD Operations
Central to our exploration was the realization that ORM is not just a tool; it's a transformative force for CRUD (Create, Read, Update, Delete) operations. By leveraging ORM frameworks, developers are liberated from the manual labor of crafting SQL queries, allowing them to concentrate on the core functionality of their applications. ORM empowers us to design elegant, intuitive data models that seamlessly translate into structured databases.
The Path to Efficiency: A Step-by-Step Journey
From the inception of understanding ORM to its practical implementation, we navigated through the steps of setting up projects, integrating ORM frameworks, crafting repositories, designing services, creating controllers, and constructing API endpoints. Each phase was a stepping stone towards a harmonious data management ecosystem that thrives on organization, separation of concerns, and adherence to modern development patterns.
A Call to Craftsmanship
As we conclude this exploration, it's essential to recognize that ORM, while a powerful ally, requires a nuanced understanding. It demands thoughtful data modeling, performance optimization, and security considerations. The selection of the right ORM framework based on the programming language, project requirements, and ecosystem is equally significant.
In Summation: A Transformed Development Landscape
"Unlocking Effortless Data Management" signifies more than a journey through ORM and CRUD operations; it represents a paradigm shift in how we approach development. By embracing ORM, we elevate our craftsmanship, enhance code quality, and future-proof our applications. With the knowledge and tools gained, we embark on a development path that is more efficient, more maintainable, and more aligned with the dynamic landscape of modern software engineering. As you continue your journey, remember that ORM isn't just about mapping objects to databases—it's about mapping innovation to progress.
For more reference, I am attaching my GitHub repository link so that you can go through the code https://github.com/Amandeepsingh25/MVC_Blog
A Heartfelt Thank You to Our Valued Readers
As we wrap up this journey through "Unlocking Effortless Data Management: Building Your First ORM-Infused CRUD API," we extend our sincerest gratitude to you, our cherished readers. Your time, attention, and engagement have made this exploration a rewarding experience for us, and we hope it has been equally enriching for you.
Embarking on a development venture is no small feat, and your dedication to learning and improvement is truly commendable. We believe that the path you're on—filled with curiosity, innovation, and a thirst for knowledge—will lead you to remarkable destinations in the world of software engineering.
With every line of code you write, every challenge you tackle, and every solution you discover, you contribute to the vibrant community of developers who are shaping the digital landscape. Your commitment to continuous growth and learning is what propels the tech industry forward, and we are honoured to be a part of your journey.
Remember, the world of technology is ever-evolving, and there is always something new to discover. As you continue to innovate, create, and share your expertise, know that your efforts are making a difference. Keep building, keep learning, and keep pushing the boundaries of what's possible.
Once again, thank you for being an integral part of this experience. Your enthusiasm fuels our passion, and we look forward to sharing more knowledge, insights, and exciting explorations with you in the future.

.
.
.
Amandeep Singh


