

Mastering NPM: A Comprehensive Guide to Creating, Publishing, and Utilizing Powerful JavaScript Packages


Understanding NPM packges
NPM (Node Package Manager) is a popular package manager for JavaScript that allows developers to share and reuse code easily. Creating and publishing an NPM package can be a powerful way to distribute your code and contribute to the open-source community. In this guide, we will walk you through the process of creating, publishing and installing an NPM package.
What is an NPM package?
An NPM package is a collection of JavaScript files, along with other resources and metadata, published and distributed through the NPM (Node Package Manager) registry. It encapsulates a reusable piece of code or a module that can be easily installed, managed, and used in JavaScript projects.
NPM packages can range from small utility libraries to comprehensive frameworks and applications. They enable developers to share their code with others, promote code reuse, and simplify the process of integrating third-party functionality into their projects
An NPM package includes the following components:
Package.json: This file serves as the package's metadata and provides information such as the package name, version, dependencies, and other details. It also includes scripts, author information, licensing, and more.
JavaScript files: These are the main files of the package that contain the code and functionality. They can include modules, classes, functions, or any other JavaScript constructs.
Additional resources: Packages can include additional resources like CSS files, images, configuration files, templates, or any other assets required for the package to function properly.
Advanced aspects of NPM packages
Dependency Management:
In the package.json file, dependencies are listed under the "dependencies" field. For example, if your package relies on the "express.js" library, you can specify it as a dependency
    "dependencies": {
      "express": "^4.18.2"
    }
You can find this
dependenciesin JSON file when you install it through npm.Private Packages:
To publish a package privately, you can use a private NPM registry or hosting platform. For this, you just have to make an NPM account and use this for hosting. Here's an example of publishing a private package using the "npm publish" command.
  $ npm publish   #use this command in directory your package is.
                  # after doing login through NPM account
Package Scripts:
Package.json supports defining custom scripts that can be executed using
npm run. For example, you can define a script called "build" that runs a build process.This allows developers to define common tasks like building, testing, linting, or running other custom scripts associated with the package. Scripts can also be chained together or configured to run in specific environments, enhancing the package's usability.
  "scripts": {
    "build": "webpack"
  }
You can then execute it using
$ npm run buildPackage Security:
NPM provides security features like vulnerability scanning and auditing to help identify and address security issues in packages. It is crucial to regularly update dependencies and follow security best practices to minimize the risk of incorporating vulnerable code into projects.
You can use the
npm auditcommand to scan your packages for vulnerabilities$ npm audit
Benefits of using NPM packages
NPM packages offer the following benefits:
Code Reusability: NPM packages provide ready-made code modules and libraries, allowing developers to leverage existing solutions and avoid reinventing the wheel.
Rapid Development: By incorporating NPM packages, developers can quickly integrate features and functionalities into their projects, saving time and effort.
Dependency Management: NPM simplifies managing project dependencies, automatically resolving and updating them with a single command. This enables developers to accelerate the development process, meet project deadlines, and focus more on business logic rather than low-level implementation details.
Community Support: NPM has a vibrant community of developers who contribute to packages, offering support, expertise, and collaboration opportunities.
Tooling Ecosystem: NPM provides a rich ecosystem of tools and utilities for tasks such as automation, testing, and documentation, enhancing development workflows.
Versioning and Stability: NPM enforces semantic versioning, ensuring developers can manage updates and maintain stability in their projects.
Open Source Collaboration: Many NPM packages are open source, enabling developers to contribute, learn, and build their reputation within the community
Setting Up Your Development Environment
Installing Node.js and NPM
To install Node.js and NPM (Node Package Manager), you can follow these steps:
Visit the official Node.js website: https://nodejs.org
On the Node.js website, you'll see two download options: LTS (Long-Term Support) and Current. It is recommended to choose the LTS version for stability unless you have specific reasons to use the Current version.
Click on the LTS download button to download the installer for your operating system (Windows, macOS, or Linux).
Once the installer is downloaded, run the installer executable file.
Follow the installation prompts and accept the default settings. You can customize the installation location if needed.
During the installation, make sure to check the option to install NPM, as it is bundled with Node.js.
Complete the installation process by following the on-screen instructions.
After the installation is complete, you can verify if Node.js and NPM were installed successfully by opening a command prompt or terminal and typing the following commands:
 node -v
 npm -v
These commands will display the installed versions of Node.js and NPM respectively. If you see the version numbers without any errors, it means that Node.js and NPM are installed correctly.
That's it! You have successfully installed Node.js and NPM on your system. You can now start using Node.js to run JavaScript applications and utilize NPM to manage packages and dependencies for your projects.
Initializing a new project
To initialize a new project in Node.js using NPM, you can follow these steps:
Open a command prompt or terminal.
Navigate to the desired directory where you want to create your project.

Run the following command to initialize a new project:
npm initThe
npm initcommand will start a wizard-like process that guides you through creating a newpackage.jsonfile, which contains metadata about your project. You will be prompted to provide information such as the package name, version, description, entry point file, author, license, and more.Answer the prompts by providing the required information. You can press Enter to accept the default values, or you can provide your own values.
Once you have completed the prompts, the
npm initcommand will generate apackage.jsonfile in your project directory, based on the information you provided.Review the generated
package.jsonfile to ensure the details are correct. You can manually edit the file if needed.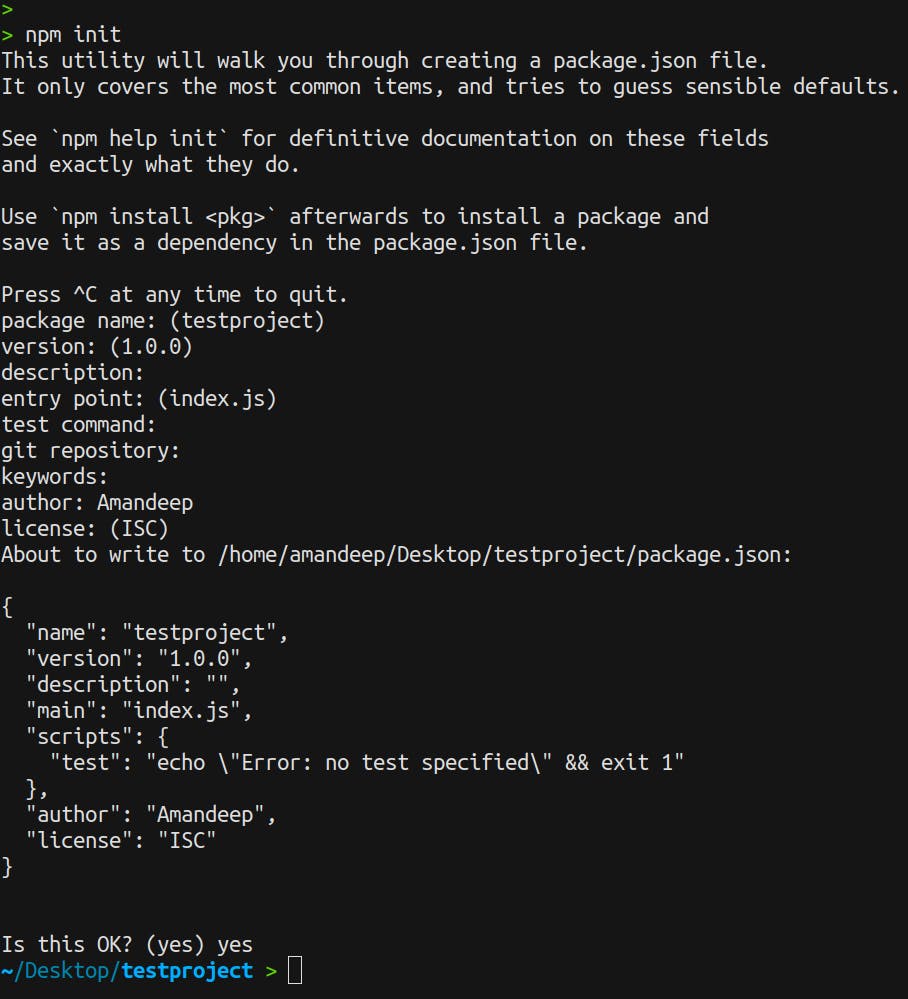
After performing the above process,
Package.jsonwill be createdNow, you can start adding dependencies to your project by running the
npm installcommand followed by the package name. For example, to install the "express" package, you can run:npm install expressThis will download and install the "express" package and add it as a dependency in your
package.jsonfile.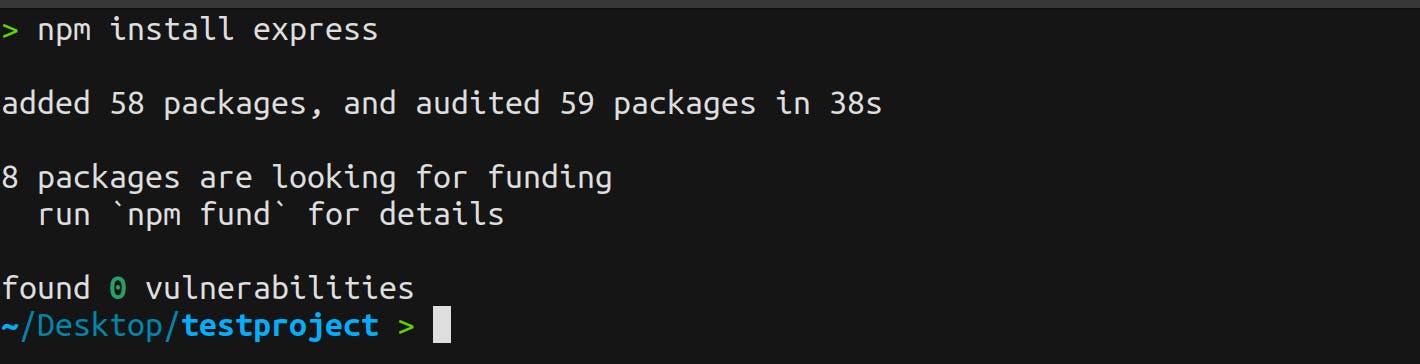
Additionally, you can install development dependencies by adding the
--save-devflag when installing a package. Development dependencies are typically used for testing, building, or development purposes. For example:npm install jest --save-devThis will install the "jest" package as a development dependency.
You can also install packages globally by adding the
-gflag. Global packages are installed system-wide and can be used across multiple projects. However, it's generally recommended to install project-specific dependencies rather than global ones.
Congratulations! You have successfully initialized a new project in Node.js using NPM. The package.json file will serve as the foundation for managing your project's dependencies, scripts, and other configurations throughout the development process.
Creating Your NPM Package
Defining package metadata (package.json)
Initialize a new project by running
npm initin your project directory.Follow the prompts to provide information such as the package name, version, description, entry point, author, license, and more.
Review and update the generated
package.jsonfile with additional fields if needed, such as dependencies, scripts, or other metadata.{ "name": "sample-package", "version": "1.0.0", "description": "A sample NPM package", "main": "index.js", "scripts": { "test": "echo \"No tests specified\" && exit 0" }, "keywords": ["sample", "npm", "package"], "author": "Amandeep", "license": "LSC" }
Structure your package:
Create the necessary directories and files for your package. Common files include the package entry point (e.g., index.js), documentation files, configuration files, and any additional resources
Create the following files and directories within your project:
index.js: This will be the entry point of your package.lib/: This directory will contain your package's library files.lib/utils.js: A sample utility module.
Write the code
Implement the desired functionality of your package by writing JavaScript code in the appropriate files.
Ensure your code follows best practices, is well-documented, and adheres to any coding standards or style guides you prefer.
Include comments and documentation within your code to explain its purpose, usage, and any important considerations.
Coding your NPM package
index.js:
  // Import the utility module from the lib directory
  const { greet } = require('./lib/utils');

  // Export a function from your package
  module.exports = {
    sayHello: function(name) {
      const message = greet(name);
      console.log(message);
    }
  };
lib/utils.js:
  // A sample utility function
  function greet(name) {
    return `Hello, ${name}!`;
  }

  module.exports = {
    greet
  };
That's it! You have created a simple NPM package with an entry point (index.js) and a utility module (lib/utils.js). The index.js file exports a function that utilizes the greet function from the utility module.
You can further enhance this code by adding more modules, functionality, and tests based on your specific package requirements. Remember to update the package metadata in the package.json file as necessary.
Once you have written your code, you can proceed with publishing your package to the NPM registry using the npm publish command.
$ npm login   #in project repository , just fill the login details of npm

$ npm publish   # this will register your package in you NPM account package section
Using this command you can publish your package on NPM. Others can use this and can contribute to it.
Testing Your NPM Package
Setting up a testing framework
Install a testing framework such as Jest or Mocha as a development dependency. For example, to install Jest, run the following command:
npm install jest --save-devConfigure your testing framework by creating a configuration file specific to the framework (e.g.,
jest.config.jsfor Jest) and specifying any necessary settings or customizations.
Writing Test Cases
Create a separate directory for your tests, such as
tests/, within your project directory.Write individual test files with descriptive names that reflect the functionality being tested. For example, if testing the
sayHellofunction, create a file namedsayHello.test.js.Within each test file, write test cases that validate different scenarios and expected outcomes for your package's functions or modules. Use assertions or matches provided by the testing framework to assert the expected results.
Here's an example using Jest:
 //test file for above created package
 // Import the function to be tested
 const { sayHello } = require('../index');

 // Write test cases
 describe('sayHello function', () => {
   test('should greet the given name', () => {
     const result = sayHello('Alice');
     expect(result).toBe('Hello, Alice!');
   });

   test('should handle empty name', () => {
     const result = sayHello('');
     expect(result).toBe('Hello, !');
   });
 });
Running tests
Open a command prompt or terminal and navigate to your project directory.
Run the following command to execute your tests:
npm testThis command will run the tests using the configured testing framework and display the results in the console.
Review the test results to ensure all tests pass successfully. If any tests fail, investigate the failures and update your code accordingly to fix the issues.
By following these steps, you can set up a testing framework, write test cases for your NPM package, and run the tests to validate the functionality and correctness of your code. Regularly running tests helps maintain the quality and reliability of your package as you make changes or add new features
Versioning and Publishing Your NPM Package
Versioning and publishing your NPM package is an essential part of maintaining and sharing your package with others. Here are the steps to version and publish your package:
Update the package version:
Open the
package.jsonfile in your package directory.Locate the
"version"field and update it according to the Semantic Versioning (SemVer) guidelines. Increment the version number based on the type of changes you have made:Patch version (
0.0.x): for bug fixes or minor changes that do not affect existing functionality.Minor version (
0.x.0): for adding new features in a backward-compatible manner.Major version (
x.0.0): for introducing significant changes or breaking backward compatibility.
Commit and tag the new version:
Commit the changes to your version-controlled repository.
Create a new git tag that matches the version number you updated in the
package.jsonfile. For example, if the new version is1.0.0, create a tag namedv1.0.0.
Publish your package:
Run the following command to publish your package to the NPM registry:
npm publishThis command will bundle your package files, upload them to the NPM registry, and make them available for others to install.
Note that you need to have an NPM account and be logged in via the command line using
npm loginwith your credentials before publishing.
Update and publish new versions:
As you make changes to your package over time, follow the same process of updating the version, committing the changes, tagging the new version, and publishing the updated package.
Remember to adhere to SemVer guidelines to communicate changes and compatibility effectively.
It's important to note that once you publish a version of your package, you cannot modify or delete it. Therefore, it's crucial to carefully consider and test your changes before publishing new versions.
By following these steps, you can effectively version and publish your NPM package, making it available to the wider developer community and enabling others to utilize and benefit from your work.
Using and Installing NPM Packages
We learn this by using our own created package above named sample-package
Using and installing NPM packages is a straightforward process. Here are the steps to follow:
Create a new project or navigate to an existing project where you want to use the published package.
Open a command prompt or terminal and navigate to the project directory.
Run the following command to install the published package:
npm install sample-packageThis command will download and install the latest version of the
sample-packagepackage from the NPM registry.In your project code, you can now import and use the functions or modules provided by the installed package. For example:
 // Import the package
 const samplePackage = require('sample-package');

 // Use the function from the package
 samplePackage.sayHello('John');
In this example, we import the
sample-packageand call thesayHellofunction, passing the name 'John' as an argument.Save your changes and run your project. You should see the output from the package function in the console.
By installing the published package as a dependency in your project, you can easily utilize the functionality provided by the package and leverage its code in your own application.
Remember to update the package version in your project's package.json file or use a versioning strategy like SemVer to control which version of the package is installed. You can also update the package by running npm update sample-package to install the latest version available.
By following these steps, you can easily install and utilize NPM packages in your projects, leveraging the functionality provided by the packages to enhance your development process and build robust applications.
Best Practices for NPM Package Development
When developing NPM packages, it's important to follow best practices to ensure the quality, maintainability, and usability of your packages. Here are some key best practices to consider:
Use Semantic Versioning (SemVer):
Follow the SemVer guidelines to version your packages accurately and communicate changes effectively.
Increment the version number based on the type of changes (patch, minor, major) you make to your package.
Communicate any breaking changes in the package documentation and release notes.
Write Clear and Concise Documentation:
Include a README.md file that provides an overview of your package, installation instructions, usage examples, and any other relevant information.
Document the API, including function signatures, parameters, return values, and any necessary usage instructions or examples.
Consider using tools like JSDoc or Markdown to document your code inline for better readability.
Define Dependencies Correctly:
Specify the correct dependencies in your
package.jsonfile, including the required version ranges.Regularly update and maintain your package dependencies to benefit from bug fixes, security patches, and new features.
Use the
--saveor--save-devflags when installing packages to ensure they are properly listed as dependencies.
Write Unit Tests:
Implement automated tests using a testing framework like Jest or Mocha to verify the correctness of your code.
Cover critical functionality with test cases and ensure proper test coverage.
Run tests regularly to catch regressions or issues early.
Keep Package Size Minimal:
Minimize the size of your package by avoiding unnecessary dependencies and removing any unused code or files.
Consider using tools like Webpack or Rollup to bundle and optimize your package, removing unused code and reducing the final bundle size.
Maintain Compatibility:
Ensure your package is compatible with different versions of Node.js and common JavaScript environments (browser, server).
Specify the supported Node.js versions in the
enginesfield of yourpackage.jsonfile.Consider using tools like Babel to transpile your code and ensure broader compatibility.
Publish and Version Carefully:
Before publishing a new version, thoroughly test your package to ensure it works as expected.
Avoid publishing frequent updates for minor changes or bug fixes. Instead, bundle multiple changes into meaningful releases.
Follow a release process that includes updating the version, committing the changes, and publishing the package.
By adhering to these best practices, you can create high-quality, reliable, and well-documented NPM packages that are easy to use, maintain, and contribute to. These practices also help establish trust among users and foster a positive developer community around your packages.
Conclusion

NPM is a powerful package manager that simplifies the management and sharing of reusable code packages in Node.js and JavaScript projects. By following best practices such as versioning, documentation, testing, and proper dependency management, developers can create high-quality NPM packages that enhance development workflows and foster collaboration within the community. NPM empowers developers to leverage existing packages and contribute to the growth of the JavaScript ecosystem.
As Writer....
In closing, as a writer, it's exciting to explore the world of NPM packages and share knowledge about their creation, installation, and best practices. NPM has revolutionized the way developers work by providing a vast ecosystem of ready-to-use code that accelerates development and fosters collaboration. Whether it's building a small utility or a complex library, NPM empowers developers to share their expertise and contribute to the growth of the JavaScript ecosystem. Embracing NPM and its best practices opens doors to endless possibilities, enabling developers to create robust and innovative applications. So, dive into the world of NPM packages, explore new ideas, and make your mark in the exciting realm of JavaScript development.

THANK YOU
.
.
.
Amandeep Singh